As a general rule, I'm not overly fond of using Active Directory or LDAP to authenticate for access to my logs. I take particular exception to having to rely on network connectivity, Active Directory availability and LDAP functionality to access logs that may help troubleshoot problems with network hardware, an AD cluster or LDAP problems. I would much, much rather my logging solution be self-contained.
That said, there has been a LOT of discussion the last few months on the ELSA users mailing list about how to configure ELSA for AD/LDAP authentication and I realised that I had absolutely no clue how to do it.
So I started envisioning a scenario...
A not-so-long time ago, in a not-so-far-away land, four friends were sitting in a coffee shop discussing what they would do after graduation. They were all very anxious because their parents had given them horrid names: TSUser, MUser, SUser and ISUser.
Each of them had unique backgrounds.
TSUser had a strong technical support background.
MUser had a strong background in making videos and posters.
SUser had paid for his college degree by selling broken toys and rotten food to local stores.
ISUser had grown up reading Nancy Drew, Hardy Boys and John Grisham books. She always wondered how she could make things do interesting things that they weren't designed to do.
The Scenario...
A not-so-long time ago, in a not-so-far-away land, four friends were sitting in a coffee shop discussing what they would do after graduation. They were all very anxious because their parents had given them horrid names: TSUser, MUser, SUser and ISUser.
Each of them had unique backgrounds.
TSUser had a strong technical support background.
MUser had a strong background in making videos and posters.
SUser had paid for his college degree by selling broken toys and rotten food to local stores.
ISUser had grown up reading Nancy Drew, Hardy Boys and John Grisham books. She always wondered how she could make things do interesting things that they weren't designed to do.
Over a particularly strong round of lattes, they decided they would forego the embarrassment of applying for jobs with their names and just start their own widget company. They wanted a company that would stand out above the rest, that would allow each of them to play to their unique strengths in technology, marketing, sales and security. They named their new company, "Test".
"Test" knew they would have computers and networking equipment and that that hardware would generate logs. To manage those logs, they decided they were going to deploy ELSA. "Test" knew they would need one group of administrators and everyone else would be a regular user.
"Test" has also decided that they want to have password policies and central authentication (TSUser and ISUser were pretty on the ball...) but they didn't want to have to worry about trying to manage group policy or domain stuff so they decided to use Lightweight Directory Services.
LDS Installation and Setup
I decided to start with a plain Windows Server 2012 install. You can test it out for six months at:
http://technet.microsoft.com/en-us/evalcenter/hh670538.aspx
I'm going to assume you have a working 2012 installation and you can see the server Dashboard. Note my server is named "WIN12-LDS" and has an IP address of 10.10.10.175.
Start the install with clicking "Manage" and "Add Roles and Features":

You can click-through the "Before you begin" page. You can also click the option on the bottom left to not show that page again:

LDS is a role-based service:

My server is named "WIN12-LDS" and does indeed have an IP address of "10.10.10.175":

Choose "Active Directory Lightweight Directory Services":

As soon as you click it, it displays an option to install the management tools (you want to do this):

Clicking "Add Feature" will take you back to the "Server Roles" page - just click Next:

There is nothing on the next page that has any bearing on us so click through:

The next page is just an overview of LDS:

At the next page you can choose to restart the server after the installation finishes, if the reboot is necessary (for LDS it is not):

After the installation finishes you can either run the LDS setup wizard or close the wizard. Since you can run the wizard multiple times (you can have multiple LDS instances on different ports), I'm opting to close the installer:

From the Dashboard, you can now run the service configuration wizard:

The setup wizard gives another quick overview of LDS:

I went ahead and named this instance, "ELSA"

This is the first LDS instance on this server, it defaults to the "standard" LDAP port of 389:

To keep things simple, I went ahead and let LDS create the new "partition". Since the company is named "Test", I'm setting the Organisation as test (o=test):

Unless you're a power-user, you can go with the default location for the new data files. "ADAM" is the old name of LDS:

Since we're going to run LDS as a network service, I'm leaving it running as the network service account:

We get a quick warning because we're not using full-blown Active Directory to manage the local server. Yes, we want to continue:

I didn't create a separate user JUST for LDS management. You can certainly do so. I opted to keep it simple and let the Administrator user be the only administrator for LDS:

A Microsoft article I found on LDS deployment suggested importing the following three LDIF files:

The next page is a summary of the configuration wizard options:

And boom goes the dynamite, LDS is ready to have users and groups added to it:

Setting Up Our Organisation in An LDAP Structure
With LDS installed and configured, the next step is to make sure the "Test" organisation, its departments and their employees are setup. This is where we'll add the users, set their passwords and, for those with SOME LDAP experience, setup the various OUs.
Microsoft provides a great GUI tool for basic LDS management called the Active Directory Services Interfaces Editor, or "ADSI Edit". You can start it from the Dashboard, under the "Tools" heading:

When it starts, you'll need to specify an AD or LDS instance to manage:

Note that I chose, "Select or type a Distinguished Name or Naming Context". This lets us work directly with the "o=test" instance. Since we're not on an AD-joined system, we have to provide the server name (in this case, localhost):

"Test" should load. As you click through the ELSA/test instance, the base items created by the configuration wizard should appear. Initially I added the first Organisational Unit (OU), "InfoSec", directly under the "o=test" level:


When I thought about it a little, I decided I wanted to add an OU called "Company Domain". This let me put each department's OU under the "Company Domain" OU. I added "Company Domain" in the same way I added "InfoSec" and then moved "InfoSec" under that new OU:


I then added the next three OUs, one each for Marketing, Sales and Tech Support, directly under "Company Domain" using the same process as when I created "Company Domain" and "InfoSec". Notice how it looks with all of those OUs created:

Now that the OUs are in place, we need groups for the ELSA users and admins. I decided to put those groups under the "Company Domain" OU. First, select "OU=Company Domain" and right-click it, then choose "New -> Object":

We know we want to add a new group:

First, let's add "ELSA Admins":

You can follow that same process for any additional groups you want to create. I added another called, "ELSA Users."
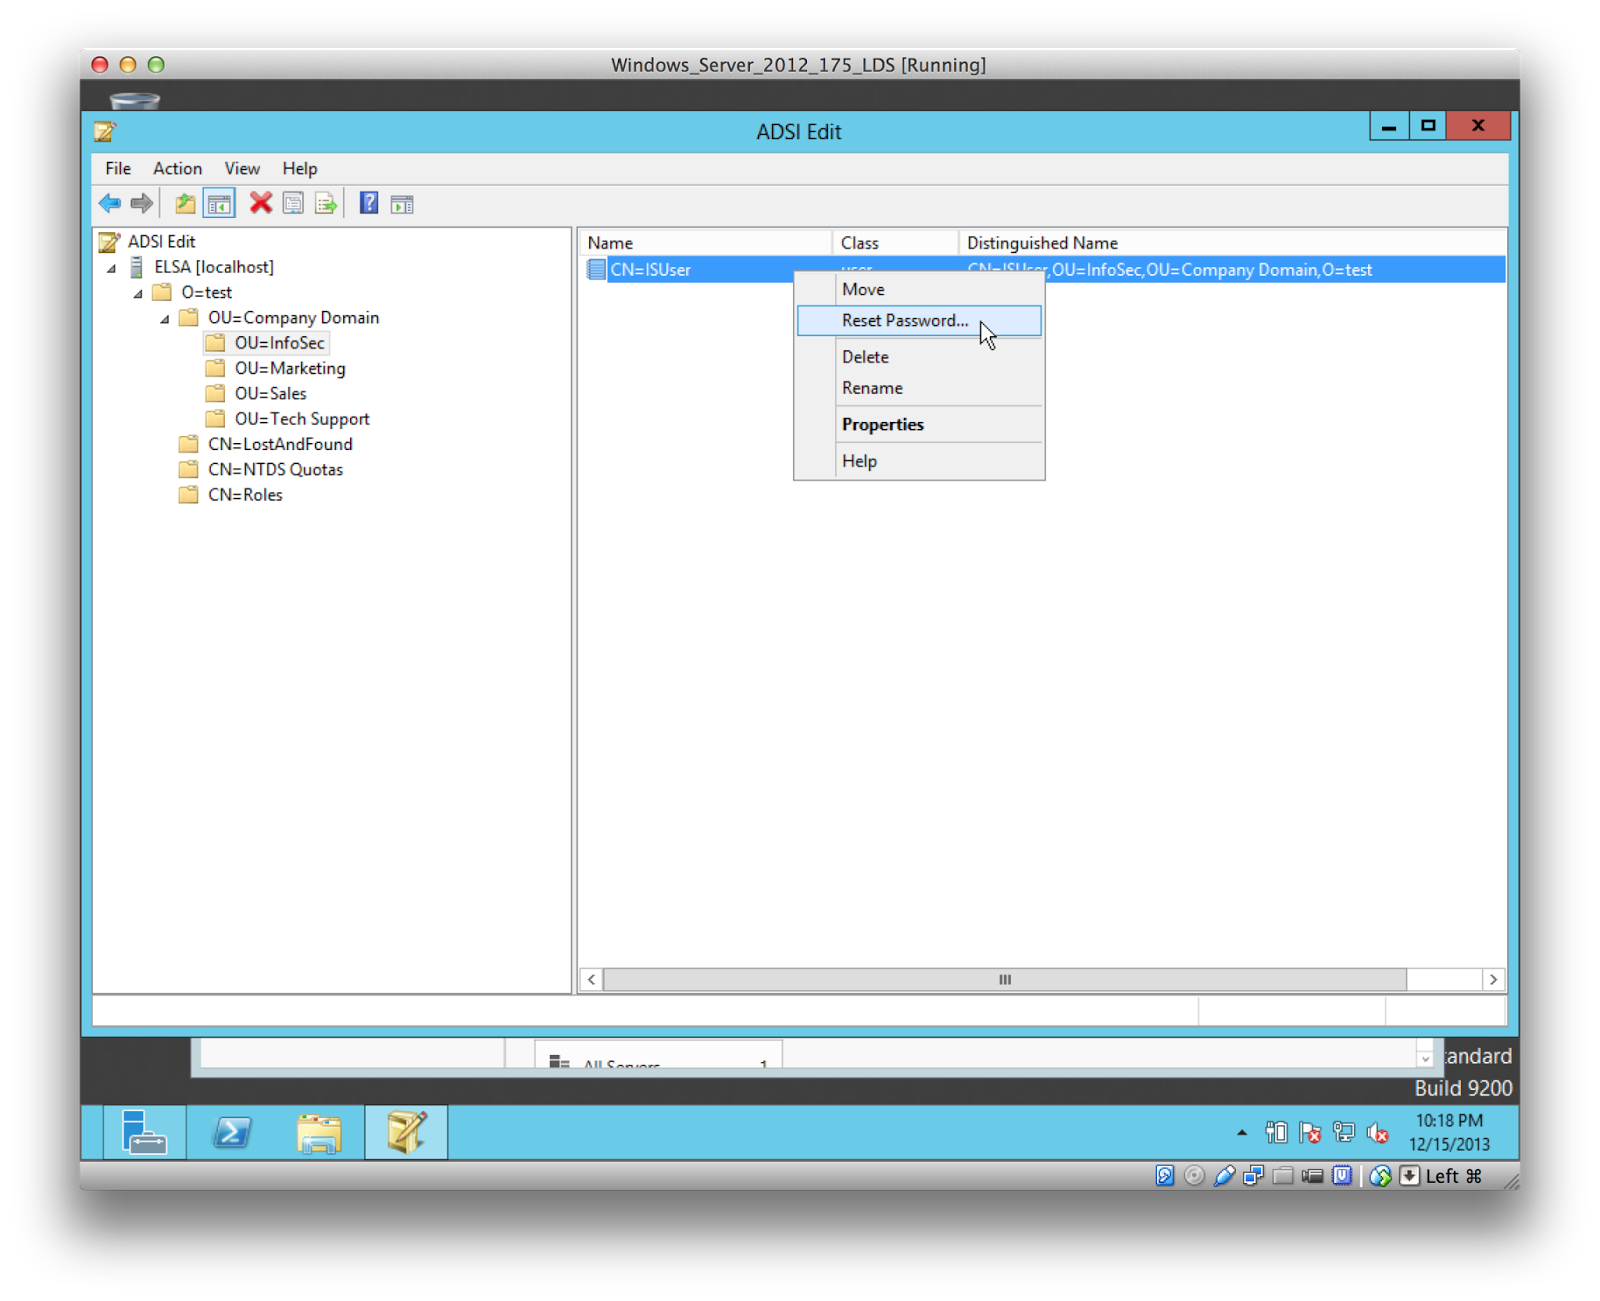
With my OUs and groups created, now I needed users. Note that users are part of an OU - when adding my four scenario users, I'm going to add them under their respective departmental OU. I included the steps for InfoSec's "ISUser":


Users are added as disabled accounts with expired passwords and without any group membership. First, I'm going to reset the password for "ISUser." In this case I used a password of, "DNpass1". This will be the password I use for every user I create for this demo. Note that users and groups have a Common Name (CN), not OU:
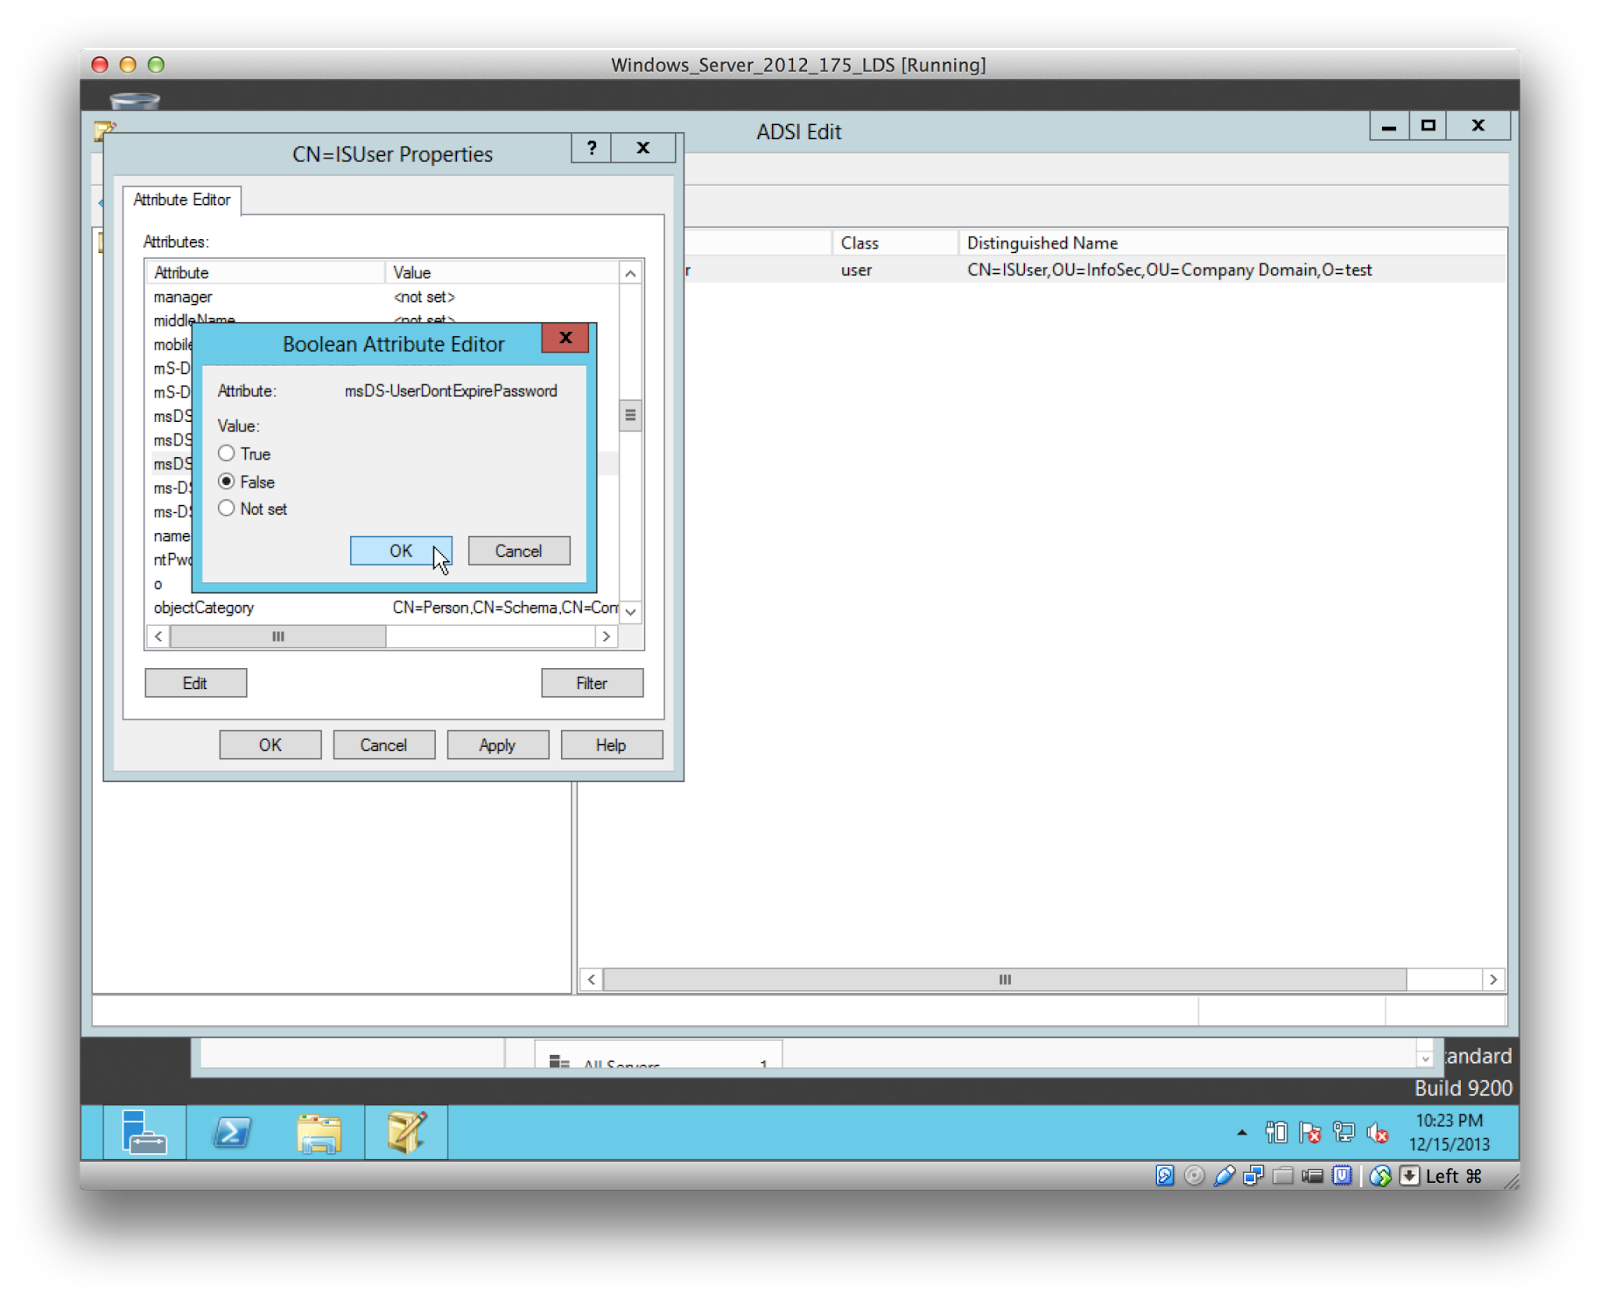
With the password set, I can go ahead and enable the account and set some necessary values. All of those things are handled through the objects "Properties":

First, let's set an email address for the user:


Set the password to follow the expiration period (setting password policies is out of the scope of this document!):

Make sure a password is required for the user:


ELSA's authentication was originally written for full-blown AD, which has a sAMACCOUNTNAME attribute. LDAP and LDS don't have that attribute by default. LDS, though, has "userPrincipalName", and it needs to be set to the value for the user's username:


Make sure the account is enabled:


It's a little time consuming but it will need to be done for each user. Note that for large deployments you can import users with default values via various scripting methods (go go PowerShell!).
When you configure an application to authenticate via LDAP, you generally get a "bind" username and password. That username is used to connect to the directory (LDAP) and it needs read access to the directory tree. You'll use a different one for each service connecting to your LDAP. In this case I want it to have a descriptive name so I'm going to create a user called "elsadn". That user isn't going to be part of the company, it's purely utilitarian, so I'm adding it under "Roles":


Even though a person won't use this account, you'll need to set a password and the expiration/password attributes for this account just like the regular users.
Once you square that user away, you need to make sure it is part of the "Readers" group. Any account in the "Readers" group has read-access to the LDS instance and it's necessary for you to setup any application that requires a "bind dn" account:

The "member" attribute is used to add users to the group:

You can add by Distinguished Name (DN). For the "elsadn" user, that is
CN=elsadn,CN=Roles,O=test


You'll add "ISUser" to the group "ELSA Admins" using the exact same process:


Note that the full DN for "ISUser" is
CN=ISUser,OU=InfoSec,OU=Company Domain,O=test


Follow the same process for adding each of the four users to the "ELSA Users" group. Once you've added the last one, the "member" attribute of "ELSA Users" should look like:

Congratulations, that finishes up the LDS component!
ELSA Configuration
The next step is configuring ELSA for authenticating against LDS/LDAP and identifying which groups are authorised to login (allowed_groups) and which are admins (admin_groups).
All configuration is handled through /etc/elsa_web.conf. The first item in that file that's relevant is "admin_groups". I went ahead and commented out the defaults because I want only the "ELSA Admins" group to have admin access.
The next item in that file is "allowed_groups". As with "admin_groups" I commented out the defaults and only allow the "ELSA Users" group to login.
With those two sections changed, they now look like:

Zooming in on just those two sections:

The next section to edit is for authentication. Set the "auth" method to "ldap" (not shown). If you've been following my ELSA posts, and following those instructions, you'll notice it's set to use "db" for authentication. Change that to "ldap".
Next you need to setup the "ldap" section. Here's where some of that LDS configuration is really important.
I don't know if it's necessary but the "ldap" section template has "admin_groups" listed again. I went ahead and filled in that value again.
"base" signifies where the root of the directory starts. In this case I'm putting everything under the "Company Domain" OU.
"bindDN" and "bindpw" refer to the username (full Distinguished Name) and password for the "elsadn" user that we're going to use for our initial binds.
The default template has a "searchattrs" value of "sAMACCOUNTNAME". That doesn't exist in LDS. Instead, LDS has "userPrincipalName", so I'm using that instead.
"host" is the actual URL for connecting to the LDAP/LDS server. If you're using "secure LDAP" then that would be ldaps:// (setting up LDAPS is outside of this document).
For the lookup/authentication of users to work, you have to have a search filter. By default ELSA compares the username to sAMACCOUNTNAME. Martin has recently added the ability to add a custom filter so I'm adding one that looks for an object of either type organizationalPerson or user and with an attribute called 'userPrincipalName' that matches the username used for authentication.
With all of those changes made, the "ldap" section now looks like:

And for clarity, just that "ldap" section:

After you save the config file, make sure to restart Apache so the changes take effect! On Ubuntu (and most Linux installations) that is:
sudo /etc/init.d/apache restart
Logging In!
With ELSA restarted, it's time to login!
I wanted to show the difference between logging in as a regular user and logging in between an admin user, both in how it appears to the user and how it appears in the database.
First, I logged in with one of the regular users, "TSUser":

Assuming everything works, you should see the "standard" ELSA search page:

Notice there is only the one tab at the top ("ELSA").
I closed my browser and started a new session to connect again, this time as an admin user ("ISUser"):


ELSA respected group membership - notice the "Admin" tab! If you click that "Admin" tab then you should be rewarded with all the items you'd expect. If you choose "Manage Permissions" then you'll see ELSA has added new users and groups for each user/group that has authenticated. I would expect to see "ISUser", "TSUser" and each of the "ELSA Admins" and "ELSA Users" groups:

That is exactly what's presented. If you click "Add" under "Exceptions" (you have to add exceptions so users can perform queries), you should see the "Exception" types:


Looking pretty good!
If we go back and then login with another user in the "ELSA Users" group, e.g. the MUser, that user then shows up in the "Manage Permissions" drop-down:

If you drop down to the database, you can see where the users/groups/mappings have been added to the appropriate tables. A select from the users table show us all of the users who have logged in:

A select from the groups table shows each of the groups that have logged in (note the user objects are also considered groups for permissions purposes):

And some basic permissions mapping has been added to users_groups_map:

Wrapping It Up
If you've followed along, and seen the above, then congratulations, our "Test" company can send their logs to ELSA and they can authenticate against their LDS server!
This is a fairly portable approach - useful since most of us will not be both the admins of our ELSA boxes and our LDAP/LDS/Domain admins. Instead, we'll probably be given the DN information and some generic LDAP information - but as long as you understand what each option does you should be able to configure ELSA to use your directory services solution for authentication and group membership.


