30 December 2017

SIEM From Scratch: Getting Logs From Google

A SIEM should be able to consume, correlate and alert on data from multiple types of logs.  Google Apps (G Suite) and Microsoft 365 have been growing in popularity for years - almost everyone in my industry use one or the other - but I see very few resources publicly available for SecOps teams to get information from them.  Even worse, most of the InfoSec and SecOps teams in my industry that DO have visibility into their Google environments are stuck with the painfully slow Google web interface for search and have to go to their Ops teams for API stuff.  I have seen *hours* shaved off investigations by having Google login and access logs stored in a local SIEM, or at least searchable by the API, versus trying to pivot inside of the web interface.  In chatting with colleagues, though, I keep finding that very few use the API - or they have to rely on an external group for that type of search.

I want to change that by writing and releasing a set of scripts to search for specific types of logs, written on top of python3 and maintained against the latest version of the Google API, using the "readonly" scopes provided by Google.  My goal is to have a starting point for SecOps teams, a place where they can see how to get rolling with the API and then build off of my starter scripts to do interesting things that address the problems they face and are tailored to their environments.

Note: I stated I want to provide something small and light.  There is already a *comprehensive* solution to interacting with the Google API via the command line called GAM: https://github.com/jay0lee/GAM

Prerequisites - Google Service Account


Before you go any further, you're going to need a service account or oauth2 access token for your Google domain.  For most of us that will mean going to our Google admins and asking for an oauth2 credentials file.  Google offers a two-week test setup if you're interested in "G Suite"/"Google Apps for Business" so I moved one of my domains and dove into their account/IAM/token tools.

I'm not going to try to document how to create a service account, that could be its own post, but more information on how to generate one can be found in the Google documentation:


After the account is created, the oauth2 token (in JSON) should look something like this:


To keep things simple, I have named mine "client_secret.json".

The three scopes that need to be authorised for the purposes of this post are:


  • https://www.googleapis.com/auth/admin.reports.audit.readonly
  • https://www.googleapis.com/auth/admin.reports.usage.readonly
  • https://www.googleapis.com/auth/gmail.readonly

In the Google Admin interface, they should be specified on one line, separated by a comma.

Each API will require a "delegation" user -- a user on whose behalf the script is running.  For the "audit" API it will probably be your account but for the "gmail" API it will need to be the user against whose account the script runs.  If you have a user, foo@bar.com, and your script is getting a list of email subjects for that user, the delegation user will be "foo@bar.com".

Prerequisites - Python Modules


My API VM is a "fresh" FreeBSD 11.1 installation but it can be any system capable of running python3 - it could be FreeBSD, macOS, any modern Linux or any modern Windows.  As I've noted in other posts, I just happen to like FreeBSD.  I've added a user named 'demo' and they're able to issue commands via 'sudo'.

With that setup, I need to install python, pip and a few python modules. First, python and pip can be installed with

sudo pkg install py36-pip

If you have a Linux background, this is the equivalent of "sudo apt install python3-pip" on Debian/Ubuntu or "sudo yum install python-pip" on RH and derivatives.


Notice that on Linux systems, this usually provides "python3".  That is typically a link to a specific 3.x version of python.  FreeBSD doesn't provide the link by default so if you're installing on FreeBSD, keep that in mind. This is why it's "py36-pip" instead of something like "py3-pip".  For example, on a system running Ubuntu 16.04.3 LTS, "/usr/bin/python3" is a link to "/usr/bin/python3.5".

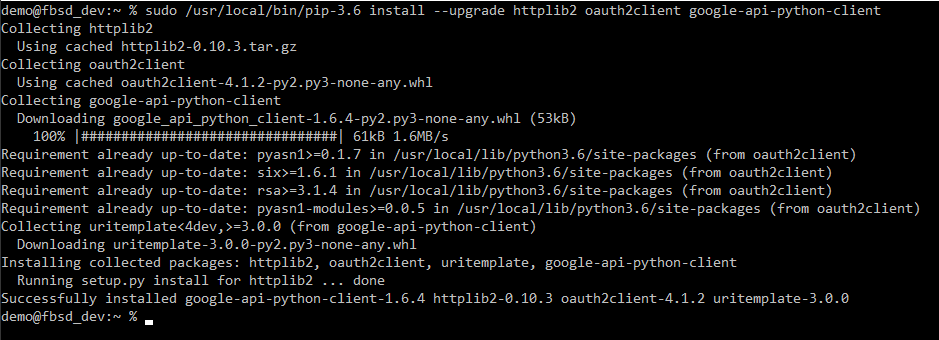
Once python and pip are installed, it's time to install the necessary python modules.  These are:


  • httplib2
  • oauth2client
  • google-api-python-client


This is why I wanted pip - some package managers will actually have separate packages for each of these but using pip lets me stay current.  Again, notice I'm calling it with "pip-3.6" instead of the "pip3" you'd see on a Linux system.


Start python from the command line with either "python3" or "python3.6" and you can interact with it directly.  You can use the following as a simple "test" script to make sure your modules are installed and will work:

import httplib2
from apiclient import discovery
from oauth2client.service_account import ServiceAccountCredentials
quit()

When I did it, it looked like this:


Start Scripting


Now that python/pip/necessary modules are installed and I have my oauth2 token and delegated account name, it's time to write a small script that reads in those credentials and attempts to connect to Google.  This first script is going to use the "Admin SDK" and you can read up on it here:  https://developers.google.com/admin-sdk.

There is a LOT of information there so to be a little more specific, we're going to use the "reports" API.  You can read more about that here:  https://developers.google.com/admin-sdk/reports/v1/get-start/getting-started

If you want to dive straight into some of their more technical documentation, I do find the API reference for the Admin SDK to be quite good in some ways and it can be found here: https://developers.google.com/admin-sdk/reports/v1/reference

With that bit of "light reading" provided, let's start on a "first script".  This will:


  • import the required modules
  • attempt to read the oauth2 token file (remember, mine is "client_secret.json")
  • attempt to set the necessary scopes (I listed them above)
  • attempt to create delegated access (this means the script will act on behalf of an actual account)
  • attempt to build an "admin"/"reports_v1" API object
  • attempt to authorise that object with Google


In code, this would look like:

import httplib2
from apiclient import discovery
from oauth2client.service_account import ServiceAccountCredentials
oauth2_file = "client_secret.json"
oauth2_acct = "my-account@my-company.com"
oauth2_scopes = ['https://www.googleapis.com/auth/admin.reports.audit.readonly',
                             'https://www.googleapis.com/auth/admin.reports.usage.readonly']
sa_creds = ServiceAccountCredentials.from_json_keyfile_name(oauth2_file, oauth2_scopes)
delegated = sa_creds.create_delegated(oauth2_acct)
http_auth = delegated.authorize(httplib2.Http())
service = discovery.build('admin', 'reports_v1', http=http_auth)
exit()

If I save it as "test_script.py", run it with "python3.6 test_script.py" and get no output, I know it works (and indeed it does for me).


The next thing I'm going to do is move the oauth2_ variables to another file called "api_info.py".  Instead of using, for example, "oauth2_file", I would have "import api_info" and then use that value with "api_info.oauth2_file".  In the long run it's going to save time and effort because I'm going to have several scripts all using the same credential information and if I change the scope, change the account, etc., I only have to change it in one place.  With that change, my "test_script.py" now looks like:


Authentication Logs


Now that I have a starting point, I want to make my script do something useful.  If you're going to start pulling logs from Google and put them into your SIEM (which should ultimately be the goal...), I would recommend starting with the login logs.  This gives you really good data like:


  • who logged in/out
  • at what time
  • from which IP address
  • success or failure


If you're correlating other authentication logs, this is a great addition for correlation.  Don't be afraid of volume here - in my day job we have approximately 20,000 users and the Google login logs are typically just a few megabytes per day.  I know of organisations with tens of thousands of users and they have 50GB/day Splunk licenses, they make sure they get their Google authentication logs.

When you query the "reports_v1" API, Google provides a list of "activities".  Each activity is a JSON object.  Those fields are documented here:  https://developers.google.com/admin-sdk/reports/v1/reference/activities/list

This is a sample failed login for one of my domains:


At 17.03 UTC on 28th of December, someone at the IP address 1.2.3.4 tried to login to Google using "a.user@my-domain.com" as the username and it failed due to an invalid password.  Yes, I edited the *content* of the fields for demonstration purposes but each successful and unsuccessful login will have each of those fields with the appropriate values. That object will come all on one line, though, so it can be a bit difficult to read.

Getting the Authentication Logs


Now it's time to work on the script so it retrieves and displays authentication logs in a meaningful way!

From the API documentation, I know that I need to call activities().list().execute(), and I know I need to give it two parameters:


  • applicationName - this will be 'login'
  • userKey - this is a specific FULL email address in your domain OR you can use the keyword 'all'


From the above screenshot, I also know that I'm going to get a bunch of JSON objects that have ['id']['time'], ['actor']['email'] and ['ipAddress'] fields, so I know I can look specifically for those.  I also know ['events'][0]['name'] is going to tell me where it was a login_success, login_failure or logout, so I want that as well.

Adding that information to my script, I know have:

import api_info
import httplib2
from apiclient import discovery
from oauth2client.service_account import ServiceAccountCredentials
sa_creds = ServiceAccountCredentials.from_json_keyfile_name(api_info.oauth2_file, api_info.oauth2_scope)
delegated = sa_creds.create_delegated(api_info.oauth2_email)
http_auth = delegated.authorize(httplib2.Http())
service = discovery.build('admin', 'reports_v1', http=http_auth)
results = service.activities().list(userKey='all', applicationName='login').execute()
activities = results.get('items', [])
for activity in activities:
  print()
  print("New login record")
  print("Time: " + activity['id']['time'])
  print("Email Address: " + activity['actor']['email'])
  print("IP Address: " + activity['ipAddress'])
  print("Event result: " + activity['events'][0]['name'])
exit()

Since I'm doing something specific, I'm going to go ahead and save this version as "get_logins.py".

When it runs, I'll get a list of the first 1000 login successes and failures for all users in my domain for UP TO the last 180 days.  The 1000 limit is easy to address but it's beyond the scope of this post; I'll provide a github link at the end that has a version of this script with it included. For example, this is an (edited) sample of what I get for an account I've only used from one location:


If I wanted to search for JUST logs for "test.acct@my-domain.com", I'd use that as the userKey value instead of 'all' and my results would be identical.

IR-driven Scripting


Since most of my work is incident response driven, let's have a wee scenario.  An attacker phishes a set of credentials and logs into someone's email.  At that point they decide to launch a spear-phishing campaign against select members of your management but they want any responses to be invisible to the person actually uses the account - maybe they add a filter that automatically sends those emails to the Bin.  It's 2 AM and the SOC analyst on-call, Lexi, gets a support ticket from the CFO saying, "this is Janet, the CFO. I just received an odd email from Steve in HR saying he has an emergency purchase that needs approval tomorrow but the file he sent me won't open! the subject is 'emergency purchase'." The analyst takes a closer look and sees it was actually submitted at 9PM the night before but they're just now receiving it.

Okay, let's walk through this.  It's 2.00 AM so calling Janet is a Really Bad Idea.  You don't call C-levels in the middle of the night unless they've JUST contacted you.  Angry spouses, upset babies, waking up a C-level, these are all resume-generating events.  Your analyst probably isn't a Google "superadmin" so they can't check the actual email log to get information about the emails sent from Steve to Janet.  For the sake of argument let's say you aren't using Vault or some other archival tool because <pick a reason>.  What does Lexi do?

As it turns out, there are a host of tools available to her via the "gmail" API.  Google's documentation for it is here:

https://developers.google.com/gmail/api/guides/

and the API reference is available here:

https://developers.google.com/gmail/api/v1/reference/

One simple thing to do would be to search Janet's email for any messages from Steve with a subject of "emergency purchase".  From the above reference, I know the API lets me retrieve a list of message IDs that match a query filter and that I can then use that message ID field to retrieve actual emails; additionally, I know that I can use ['payload']['headers'] to get the message headers (like "From", "To", "Subject", etc) and I know there is a ['snippet'] field that has a short, plain-text version  of the email. With that knowledge, I can write something like the following:

import api_info
import httplib2
from apiclient import discovery
from oauth2client.service_account import ServiceAccountCredentials
query = 'subject: "emergency purchase'
userID = 'cfo.janet@my-company.com'
sa_creds = ServiceAccountCredentials.from_json_keyfile_name(api_info.oauth2_file, api_info.oauth2_scope)
delegated = sa_creds.create_delegated(userID)
http_auth = delegated.authorize(httplib2.Http())
service = discovery.build('gmail', 'v1', http=http_auth)
query = 'subject: "emergency purchase'
userID = 'cfo.janet@my-company.com'
results = service.users().messages().list(userId=userID, q=query).execute()
messages = results.get('messages', [])
for aMessage in messages:
  mid = aMessage['id']
  msgObject = service.users().messages().get(userId=userID,id=mid).execute()
  for aHeader in msgObject['payload']['headers']:
    if aHeader['name'] == "To":
      print("Recipient is: " + aHeader['value'])
    elif aHeader['name'] == "From":
      print("Sender is: " + aHeader['value'])
    elif aHeader['name'] == "Subject":
      print("Subject is: " + aHeader['value'])
    elif aHeader['name'] == "Message-ID":
      print("Message ID is: " + aHeader['value'])
    print("Snippet from email: ")
    snippet = msgObject['snippet']
    print(snippet)
    print()
exit()


NOTE: the gmail.readonly, gmail.modify or https://mail.google.com/ scopes must be allowed for this to work.  I HIGHLY recommend using the gmail.readonly scope unless you want your SecOps team to have the ability to delete emails (which you may do once they're adept at finding the message IDs of phishing messages).

If Lexi had such a script, named 'get_headers.py', and were to run it, she may get something like this:


Using the same API, she could go further and retrieve the actual attachment.

What if the email HAD come from Steve's proper account, though?  At this point Lexi could use get_logins.py to see which IPs had accessed Steve's account and then look for additional accounts being accessed from the same address.  She could then possibly find other malicious/phishing emails that were sent and, if allowed the .modify scope, delete them from user mailboxes before the user ever sees them.

Wrapping Up


The Google/G Suite API offers a fantastic opportunity for incident responders and SecOps teams to have visibility into their email and collaboration environment.  It not only allows us to pull information in an easily-parsed format (json) for one-off searches but also to pull logs in volume to import into our (hopefully) much faster and more powerful SIEMs.  With a little bit of tuning, any of the scripts I've offered above can write log data in CSV, JSON or XML, with field and header names of your choosing, and they can be executed via any scheduling mechanism your operating system uses.  Since this is part of a series about being a SIEM, a post in the very near future will rely on some of these scripts writing out in JSON so if you do take a look at them on github, know they are very much early versions!

As promised, they're at:

https://github.com/kevinwilcox/python-google-api

Take a look at all the other tools that are available, by all means.  GAM is the de facto for managing Google domains from the CLI and should be part of everyone's toolkit...but if you're going to embed GAM into a script to do something, why not use the API directly to accomplish *exactly* what you want?

16 December 2017

New Multi-Part Series: SIEM From Scratch

This year I've really jumped into the Elastic stack, rolling out dozens of small environments for personal projects and working countless undocumented evenings at my day job to profile performance, test filters and deliver the log aggregation ecosystem I'd promised my system administrators, network admins and superiors that I could deliver. I've written several posts on Logstash and Elasticsearch that were geared for folks trying to get started with the ecosystem. I hope others have found them useful and I hope they've been able to grow their environments into something that does what they need.

Every day I see more and more articles and blog posts about doing interesting things with Elastic, about deploying it as a log aggregation system, written by people who are infinitely more talented than I. They do fantastic things with the platform and I will readily admit my envy for what they are able to accomplish. My issue with those great tutorials is that they don't usually put things together in a way a true beginner can follow - they assume someone who has a specific task they want to accomplish (using various filters for enrichment, getting Windows logs into an existing stack, using the stack for DNS analysis, etc).

I am guilty of the same thing. My "getting started" tutorials assume you already have an interest in the stack and need to accomplish specific tasks. I believe this is useful and has its place; I also believe there are people who want to solve a larger problem and need a little bit of hand-holding until they're ready to start asking questions about those specific things. That's where my new multi-part series will come in.

This weekend I am starting a new set of posts that have a clear goal in mind. This is for the people who are 100% brand-new to log aggregation and SIEM, the folks who may have just made a career change (or want to make a career change) to SecOps (or Ops), the ones who have just inherited a dozen servers that all log to local files in interesting and who will benefit from aggregating those logs, the people who have just found out they're responsible for PCI compliance at their small organisation and need to start building a monitoring and alerting program with basically no budget. My goal is to give you the means to deploy a log aggregation platform that allows you to normalise log data, search logs from dozens of devices in seconds and generate alerts so you know when odd things are happening, all with the assumption that you have no prior experience in any of those areas.

This weekend I'm starting "SIEM From Scratch" and I'm pretty excited about it.

12 November 2017

Logstash Profiling: Time in the Pipeline

I have been pushing Mark Baggett's domain_stats.py (https://github.com/MarkBaggett/domain_stats) script out to my logstash nodes this week and I saw a pretty big hit on throughput. That's okay, this was expected - the script goes out and does a whois lookup for every domain you send to it, then caches the results in memory. The first time it's super slow if whois is slow, the next time it's super fast. It's pretty awesome.

When I found out about the script from Justin Henderson (https://github.com/smapper), he warned me that it's best used on domains that aren't in the Alexa/Umbrella Top One Million. He's right, for the most part there isn't really a reason to do lookups on domains that are popular enough to be in the top one million sites on the Internet, but I'm not tagging those yet and sometimes I just really want more information about ad networks when they show up in my DNS logs. As a result, I started sending my 1k DNS queries per second to domain_stats and I *very quickly* saw a drop in throughput.

That left me with two questions:

  1. How many events were going through my pipeline each second before and after I started doing DNS enrichment?
  2. How long does each event, on average, spend in my pipeline, both before and after I started doing DNS enrichment?

X-Pack is fantastic for measuring events per second and I'll address its installation/configuration soon. The more interesting question right now is the latter and the solution was a lot easier than I thought it would be.

My Pipeline


Before I get into timing, I want to give an overview of my log pipeline. I have a cluster of logstash ingest nodes that receive events via a combination of inputs. These nodes send data to a RabbitMQ cluster that uses mirrored, persistent queues (highly available queues that store messages on disk). Another logstash cluster pulls events from RabbitMQ and then runs each event through a series of filters that parse fields, normalise names, add fields based on the workflows of my coworkers, enrich with additional information based on the fields already present in each log item and then send the enriched/processed data to the appropriate Elasticsearch index. That means from end to end, the log flow is:

[ endpoint beat ] --> [ logstash_ingest ] --> [ rabbitmq ] --> [ logstash_enrich ] --> [ elasticsearch ]

There are several ways to lay things out and it's perfectly acceptable to have endpoints use beats to write directly to Elasticsearch, if that's your preferred method. I've used Kafka as a message buffer and it works well - and the beats can write to it natively! Don't assume this is THE way to do it, figure out what works for you and what addresses the risks you face.

The Goal


The question I want to answer is how much time an event spends in my pipeline: I want to know when it enters the pipeline, when it comes out of RabbitMQ and when it is sent to Elasticsearch. To do this, I decided to:

  • add a timestamp as the first (and only) filter when an event is received by an ingest node, called "pipeline_start"
  • add a timestamp as the first filter on the enrich cluster when an event is retrieved from RabbitMQ, called "pipeline_rabbitmq_out"
  • store the difference between "pipeline_rabbitmq_out" and "pipeline_start" as "pipeline_rabbitmq_processing"
  • add a timestamp as the last filter on the enrich cluster, before the event goes to Elasticsearch, called "pipeline_stop"
  • store the difference between "pipeline_start" and "pipeline_stop" as a field called "pipeline_processing_total"

It's pretty basic timing and it gives me an easy way to look *at any log event* and see if the overhead was on ingest/rabbitmq or if it was the enrichment cluster.

Making it Work


The easiest way I've found to add a timestamp to an event is with the ruby filter:

filter {
  ruby {
    code => "
      event.set('s_time', Time.now)
      sleep(1)
      event.set('e_time', Time.now)
    "
  }
}

This adds a field, s_time, that is an ISO8601-formatted timestamp with the current time. It then sleeps/waits for one second and adds *another* field, e_time, that is also an ISO8601-formatted timestamp with the current time. Since there is a one-second pause between the two timestamps, there should be a one-second difference when I use this as my filter. Note I'm using stdin for input (so I can type something in) and stdout with the rubydebug codec as my output (so I can see the parsed version of what I type in).

My entire testing config looks like this:


And when I run it with the test input of "my great log event", I get this:


Indeed, I have two timestamps, s_time and e_time, and they are one second apart!


Taking the Difference


Now let's go a step further. Having the timestamps is great but that leaves me looking at multiple fields and seeing the difference. Can't I just get the difference in ruby and store that as a third field?

Well...yes I can!

Ruby lets you subtract one timestamp from another and it handles all the type conversion on the backend. That means I can do something like "e_time - s_time" and Ruby will "just take care of it".

I'm going to update my filter to do the subtraction and store the third field, p_time (for processing time). Note I'm using "event.set('foo')" and "event.get('foo')" to set and retrieve the fields in my log event:


Now when I run with the same test input, I get:


p_time exists and it's being parsed as a number - you can tell because it's in blue and NOT in quotation marks. If I were sending this to a full ELK stack I could have a dashboard that showed the average p_time and, if I were tagging my logs, the tags associated with the events that took longest to process. Pretty useful information!


A Caveat: Time Objects Versus Strings


When I put this into production, I hit a bit of a snag. I was adding my start time in the first logstash cluster, sending the event through my buffer, then adding the second timestamp and finding the difference in the second cluster. event.get('s_time') would give me the ISO8601 timestamp but my processing times were coming back as the floating point representation of the ending timestamp. This means my start times were being stored but they were being treated as a zero during subtraction. I don't know why this happened, I don't know if it was something happening with logstash or RabbitMQ, but it was problematic!

After a bit of digging, I found out about the "Time.parse()" method in Ruby. This lets you create a Time object from a formatted string. To better represent how I've setup my filters, I'm going to separate setting the s_time and e_times into different filter blocks. In the first block I'm going to get the timestamp as a formatted string instead of as a Time object and store that as s_time. In the second block I'll use local variables to do the arithmetic and then store the e_time and p_time values using the "event.set('event_field', 'local_variable')" syntax:


When it runs, I get the following:


e_time is a timestamp object but s_time is an ISO8601-formatted string. That's okay! When the values are sent to Elasticsearch, it will store both as timestamps. I don't have a use-case for searching these yet but while I'm debugging I have no incentive to remove them.

One decision I did make when I did this in my production clusters is to only apply the pipeline timing filters to events with a "pipeline_metric" tag. This allows me to only add the timestamps to select groups of logs (or for one of my sys-admins to tag the logs they're sending, should they decide to test processing time).

Wrapping Up


As I stated, X-Pack does a great job of showing general metrics - events received and sent by logstash, how much CPU and heap is being used by logstash or elasticsearch, how many events per second are being indexed by an Elasticsearch cluster (or node), etc - but it doesn't really help me evaluate how long it takes to process an event. Logstash offers an "elapsed" filter but that is only useful for the time that has elapsed between two log events, not since certain actions were taken against a specific event. This gives me a clean way to solve that issue.

More than just the system time is available to ruby. With multiple Logstash clusters, maybe it's good to know which ingest or processing node handled a given event - you can add this with:

event.set('node_name', Socket.gethostname)

If you combine that with time-based metrics, you suddenly have the ability to make *very* useful dashboards about which types of logs are taking the longest to process, which filters are taking the most time to run and which nodes have the highest (or lowest) processing time for those logs. It's pretty powerful stuff!

16 September 2017

Puppet Part Three: In Which I Write My First Module

In my previous post I wrote a manifest for stark that removed specific groups/users and added specific groups/users. This allowed me to do some user standardisation on stark (if this doesn't make sense to you, please read my previous post, Puppet Part Two). On the whole it's pretty nifty, right? I mean, I could copy and paste the user/group stuff from stark's manifest into the manifests for the other systems and have my user needs satisfied...but is that the best way?

Modules: A Quick Overview


There are _a lot_ of things to say about modules and the Puppet documentation on them is here:


The short, short version is that modules let you write something one time and then use it in lots of places. Modules are made up of classes and a class, ideally, should do one thing (object-oriented programming is the programmer's derivative of the Unix philosophy?). For example, you may have a module called 'ssh' - then that module may have one class for installing the SSH server package, another class to configure sshd_config and another class to configure the system ssh_config.

Using my scenario above, I have a group of accounts that I want to exist on <some or all of> my servers. Instead of creating those accounts in every manifest I have, I can write a module that does account-y stuff and then add that one module to each server's manifest. Then when I need to delete an account I can do it one time, in my module, and as my servers check in, they'll get the new configuration and remove the account. Write once, use lots of places, problem solved!

One quick note: remember, I'm a Puppet noob. I've written very basic modules to do user-y and basic administration-y type stuff. I've not written modules to do more complex things. That's okay, we're learning (more or less) together and the Puppet folks on Twitter (@puppetize) are phenomenally supportive.  Their documentation covers doing interesting things, I'm just covering getting started. I may do some more complex things in several months but for now, I'm relying mostly on the work of others and I'm keeping MY work fairly simple.

With that said, let's write a module that does some basic administration-y type things that allow for standardisation of some system services.

The Layout


There are some requirements for Puppet to use a module. It needs to be in a directory that is designated for modules in Puppet's configuration. On Ubuntu, by default, these are:

/etc/puppetlabs/code/modules
/etc/puppetlabs/code/environments/production/modules

This is configurable but that configuration is outside the scope of this post. Maybe later, if I dive into multiple environments or custom paths for multiple maintainers.

A module itself needs a few things to work. At a bare minimum, it needs:

o a metadata.json file that gives the module name, version, author, summary, license and some other information
o a manifests directory
o a manifests/init.pp file that has the initial class declaration; the initial class is the same name as the module

I know, that last bullet may be a little confusing. It will make more sense when we take a look at one.

Three Choices


There are three ways to create a module. You can copy an existing module into the appropriate directory and modify it to fit your needs but that can be a lot of work - it is worth it to have a template you can copy over for new modules if you're going to write several of them but that may be unlikely.

The second option is to use the 'puppet module' command. This is the same way you install and remove 3rd party modules and it is an easy way to create the initial directory structure, metadata file, init.pp file and basic documentation. Using the 'puppet module' command also creates several more files and sub-directories built around the idea that you're going to share your module with the world and do testing across multiple platforms. It is the most complete method available and everyone writing puppet modules should use it at least once.

The third option is to create the necessary directories and files yourself. This was my choice since it's not a lot of work, I'm not doing anything especially complex in my modules and I don't plan on sharing them with anyone. By choosing this option I'm almost guaranteeing to do something in an incorrect way, do it manually at your own risk!

Create the Module


Puppet lets you store modules pretty much anywhere on the filesystem you want to, provided you tell it where to find them. I like using /etc/puppetlabs/code/modules so that's where I'll create this one.

First I'll change to that directory:

cd /etc/puppetlabs/code/modules

Then I'll make the directory structure and required files for my new module, "my_users". Ordinarily I would name using "camel case" or "stair-stepped case" - "myUsers" - but when the puppet agent does a manifest lookup it would look for "myusers" and that would fail. I have several classes with an underscore in the name now...

mkdir my_users
mkdir my_users/manifests
touch my_users/metadata.json
touch my_users/manifests/init.pp

Then I'll add the following to the 'my_users/metadata.json' file:


Here is the copy/paste version:

{
  "name": "test-my_users",
  "version": "0.0.1",
  "author": "my name",
  "summary": "User and group standardisation for my VMs",
  "license": "BSD 3-Clause",
  "source": "",
  "project_page": "",
  "issues_url": "",
  "dependencies": [
    { "name":"puppetlabs-stdlib", "version_requirement":">=1.0.0" }
  ],
  "data_provider": null
}

A few quick items. Notice I've named it "test-my_users". The name of the module is the format <author>-<module name>. I'm just using "test" because, well, this is a test after all! I've used "my name" as the author but it doesn't matter which name you use here. I like the 3-Clause BSD licence, also known as BSD 2.0, so that's what I'm using - it basically says use the module however you want but do so at your own risk, I'm not liable if it destroys your data centre, just using the module doesn't mean you'll get support, I'm not endorsing your product and, if you use the module in your product, you have to say you're using it. Read the licences that are out there, they're important.

Right now I just want to get a module that loads so I'm going to use a very basic my_users/init.pp file. All I'm putting in it is the initial class declaration:


At this point it doesn't do anything but it's a good time to see if I can use it with a manifest.

Include and Require


There are two ways to make sure a manifest uses a module or class - either by using "include" or by using "require". These have two very different meanings!

"include" tells puppet to make sure the contents of a class are included when it generates the list of things for an agent to do. You could, in theory, include ten different classes that all include each other and puppet can sort that out. Using "include" does not put any specific constraints on ordering - it lets puppet sort all of that out.

"require" tells puppet to make sure the contents of a class are included *in a specific order". If puppet sees a "require" statement, it will make sure everything that is part of that "require" statement is done before continuing. That is great if you need to have things happen in a certain order, ensure specific files exist before starting a service, etc., but in general it can lead to some serious management headaches. I will use "include" unless I absolutely need to use a "require".

Using a Module or Class in a Manifest


I know that baratheon, my actual puppet server, is set to be managed by puppet because I configured it that way in my Puppet Part One post - if you read that post, though, you'll see it has an empty manifest. All the manifest contains is:

node baratheon { }

(reminder: I put that file at /etc/puppetlabs/code/environments/production/manifests/baratheon.pp)

To use the 'my_users' module, I need to add a single line to baratheon's manifest file. After editing, it will look like this:


For copy/paste, that is:

node baratheon {
  include my_users
}

This tells puppet to look in the module directories and use/include the code from the class named 'my_users'. I also could have used:

node baratheon {
  require Class['my_users']
}

Again, I don't have a specific need to use "require" so I'm using "include".

The Test...


Now that I've told puppet to use the "my_users" module, I need to test it. I can do that with:

sudo /opt/puppet/bin/puppet agent --test

If everything is good, it should compile the catalogue and return me to a prompt:


Success! Now I'm ready to make the module do something useful.

Make my_users Useful


A module is made of classes and classes do one thing. Otherwise, they do the same thing as a system's manifest! Since I have already written the code/configuration necessary to do user stuff in the stark.pp manifest, I'm going to copy it into the my_users class:


Then I'm going to test it with "puppet agent --test":


Oh no, something went wrong! ... or did it? Remember, the problem I'm trying to solve from Puppet Part Two is that I have Ubuntu systems with a user named 'test' and CentOS systems with a user named 'demo'. My goal is to remove those users and add one named 'secops'. Since I'm logged in as the 'test' user, it's going to fail on deleting the 'test' user and group. I have two choices - I can either logout and wait ten minutes (because I have puppet configured to run every ten minutes) or I can just reboot the machine. I'm going to reboot...

With the VM rebooted, I'm going to see if the 'test' user still exists:


Notice the 'Login incorrect' - the system did remove the 'test' user! But am I locked out?


No, I'm not! Success!

Just because you can use puppet to manage itself doesn't mean that's always a good idea. Weigh the cost/benefit before doing this. I like this example because it shows how quickly and easily you can lock yourself out of your management server. BE CAREFUL!

Wrapping Up


Now that I have a class for user management, I can start to simplify management. First, I can edit the manifest for stark and cut out everything I have in there -- and replace it with an include for the my_users module, the same way I did for baratheon. I can add the same include statement to the manifests for lannister and bolton. By using modules/classes, I can write one time and then include it everywhere I want to have the 'secops' user with the 'secopspass' password.

To go even further, if I need to change the password for the 'secops' user on all of my systems, add a different user, add an SSH key or more, I only need to edit the my_users class and that change propagates to all systems that use it. That is MUCH more efficient (and reliable!) than having that functionality in each server's manifest and editing possibly hundreds or thousands of files just to make one small change.

As I pointed out in a previous post, Puppet is not alone in this functionality. SCCM, ansible, chef and others are all capable and each brings their own strengths/weaknesses to the table. Each one deserves a close look and consideration, even in smaller environments.

29 July 2017

Puppet Part Two: Groups, Users and Simple Manifests

In my first Puppet post I went through the setup process on both the Ubuntu and CentOS Linux distributions. That post ended with four VMs:

o baratheon, the Puppet server
o stark, running Ubuntu
o bolton, running CentOS
o lannister, running CentOS

My previous post ended with all four systems polling baratheon (the Puppet server is configured to manage itself) but nothing was actually managed by it. Two of the VMs, baratheon and stark, have a group and user named 'test'. The other two, bolton and lannister, have a group and user named 'demo'. In this post I want to:

o remove the 'demo' user
o remove the 'demo' group
o remove the 'test' user
o remove the 'test' group
o standardise with a 'secops' group
o standardise with a 'secops' user
o make sure the 'secops' user's home directory is created
o make sure the 'secops' user is in the sudo group
o set an initial password for the 'secops' user
o set a password expiration of ninety days for the 'secops' user

All of this can be done using Puppet's built-in features.

Users, Groups and Resource Types


Puppet has what it calls "resource types", built-ins for basic system functions. Tonight I want to focus on two of them, the "group" and "user" types. If you want to read all about them, the Puppet documentation is rather good:


I'm intentionally linking to the 4.10 documentation because that is the version currently installed via pc1. They have a drop-down available for viewing the documentation from other releases. You can install a newer version, 5.0, but none of the 3rd-party modules I've started using officially support 5 so I'm sticking with 4.10!

That's all well and good...but how does one use them?

Adding a Group


I'm going to start with the manifest for stark and adding the 'secops' group. I'm adding the group before the user because I want the user to be a member of the group and if the group doesn't exist, the user creation can fail.

I created stark's manifest (/etc/puppetlabs/code/environments/production/manifests/stark.pp) in my previous post but all I put in it was an empty definition, basically the bare minimum for the Puppet agent to successfully "check in". I could start with the manifest for the Puppet server, baratheon, but I want to make sure the configuration does what I want it to before I risk losing the only user I have on my Puppet server!

Right now, stark's manifest looks like this:

node stark { }

The basic format for adding a group is:

group { 'resource_title':
  ensure => present
}

This will make sure a group named 'resource_title' gets created. You can also remove a group with "ensure => absent". There is an option to explicitly name a group with "name => 'group'", otherwise it is implied that you want to use 'resource_title' as your group name. The more I think about it, the more I like this functionality - it means you can do something like this:

group { 'add_special_group':
  name => 'special',
  ensure => present
}
group { 'remove_old_group':
  name => 'old_group',
  ensure => absent
}

With that said, to add a group called 'secops' with the 'group' resource type, I can change the manifest to look like this:

node stark {
  group {
    'secops':
      ensure => present
  }
}

Notice I moved the "resource title" to a line by itself. That's a personal preference because I don't like having anything after the opening brace - either way works.

Once the file is saved, that's it, that's all I have to do. The next time stark checks in with baratheon, it will get its new manifest and will add a group named 'secops'. If the group already exists it won't do anything because the requirement is already met. Since just waiting for stark to check in and update at its next interval is kind of boring, I'm going to force the check-in with 'puppet agent --test':


Now that I have a 'secops' group, I can add a 'secops' user who is a member of that group.

Adding a User


The syntax for the 'user' type is identical to that for the 'group' type (all Puppet resource types use the same syntax). For example, if I want to make sure a user named 'special_user' is present, I can do this:

user {
  'special_user':
    ensure => present
}

If the user doesn't exist, Puppet will add a user named 'special_user', a group named 'special_user' and create a home directory for that user. For the average user that's exactly what I might want but what if I want a group named 'infosec' and accounts for 'analyst_0', 'analyst_1' and 'analyst_2' that are all members of the 'infosec' and 'sudo' groups? Puppet can do that!

Building off the above, to add my 'secops' user I will use:

user {
  'secops':
    ensure => present,
    gid => 'secops',
    groups => ["sudo"],
    managehome => true,
    password_max_age => '90',
    password => '$1$ekSmGk/O$ne219/isubq6Q26jE8CKa.'
  }

This does *a lot*. Let's step through it.

First, it makes sure there is a user named 'secops'. Then it sets the primary group for the user to 'secops' and makes sure the account is also a member of the 'sudo' group. "sudo" doesn't need to be passed as an array because I'm only adding the user to that one additional group but I'm doing it as an array anyway to show you can pass an array of groups. Even though Puppet defaults to managing whether a home directory is created, I explicitly tell it to manage this user's home directory. On Linux, Solaris and AIX, Puppet can set a password expiration age so I'm setting that to 90 days. Finally, I'm providing the password hash for my user. Linux can use multiple hash types for passwords, from MD5 to SHA512, and in production I might use SHA512, but since I'm typing this password hash I'm going to use MD5. An easy way to get an acceptable hash is with 'openssl passwd -1', which then prompts for the value to hash and uses MD5 to hash it (if you're curious, the password I hashed is 'secopspass'; if you want to crack that hash, the salt is the value between the second and third $ symbols).

The actual manifest and the results of forcing the check-in look like this:


Notice how the user now shows up in /etc/passwd, they're in the groups 'secops' and 'sudo' and they have a home directory of '/home/secops'. Success!

Removing the Existing Users


Now that I have the user and group added that I want, I can set about removing the existing users I no longer need. This is almost a copy-and-paste of something I wrote above. To remove the 'test' user, I can use:

user {
  'test':
    ensure => absent,
    managehome => true
}

I also want to remove the *group* named 'test', since that group only existed for the 'test' user. This would look like:

group {
  'test':
    ensure => absent
}

Since I want to remove the 'demo' user from other systems, I'm going to go ahead and add a section for that as well. It won't do anything on stark but this is setup for my third post.

user {
  'test':
    ensure => absent,
    managehome => true
}
user {
  'demo':
    ensure => absent,
    managehome => true
}
group {
  'test':
    ensure => absent
}
group {
  'demo':
    ensure => absent
}

When the Puppet agent on stark checks in, it will delete the 'test' user -- but that's the user I'm using! To avoid any issues, I've logged out as the 'test' user and logged in with 'secops' (remember, the password is 'secopspass'). The manifest and results of forcing the check-in look like this (so that I could get it in a screenshot, I've moved the resource titles to the same line as the opening braces):


The user and group have been removed: the account doesn't show up in /etc/passwd, the group doesn't show up in /etc/group and the user's home directory is gone. I now have my 'standard' set of end-users and groups set on stark!

Wrapping Up


My goal was to show how to add and remove both users and groups with Puppet - we've achieved that. To add more users to stark I would just add more user sections. The same goes for groups - to add more, just add more sections.

That's _great_ for stark, but what about the other systems? It's a bit tedious to copy and paste all of that Puppet code into the manifest for each system, isn't it? I'm only working with four servers so it isn't too terrible but imagine having to add a user to forty, four hundred or maybe even four *thousand* systems. Copying that code into each system's manifest would take longer than both writing AND RUNNING the script to do the work for you. That's where modules, roles and profiles come in and in my next post I'm going to cover how to create a profile for (and assign that profile to) all of my Linux servers so that when I need to change the password hash, add new users or change the password age, I only have to edit one file and everything gets sorted as systems check in.

14 July 2017

So...I thought I'd Jump Into Puppet (Puppet Part One)

A Quick Note


A lot of folks like to write about things they know very well and about which they can answer questions. Generally speaking I prefer to write about things that I can at least troubleshoot to *some degree*. The next few posts will not be any of those because I have no idea what I'm doing with puppet. I'm pretty excited!

The Test Environment


My environments are primarily Ubuntu Linux with a smattering of Windows Server 2012R2, Windows Server 2016 and CentOS. To keep things simple I'm going to stick with Ubuntu Server 16.04 and CentOS 7.

In the last year I have jumped really, really deep into the Elastic stack. I've seen demos for things that ultimately border on useless because  they either a) assume your environment is very small or b) show you how to add '2 + 2' and then expect you to make the leap from that to differential equations. I'm not going to do that.

Instead, I want to go step by step (more or less) from four fresh Linux systems to a fully configured ELK + RabbitMQ stack, managed almost entirely via puppet. This entire ecosystem will look like this:

o Ubuntu Server 16.04.2 LTS for puppet named baratheon
o Ubuntu Server 16.04.2 LTS for ELK named stark
o CentOS 7 for ElasticSearch named greyjoy (this will cluster with ES on stark)
o CentOS 7 for RabbitMQ named bolton

Each server will have one core, four gigabytes of RAM, twenty gigabytes of disk and four gigabytes of swap.

Note: All of the documentation I've read expects your puppet server to be named 'puppet'. When the puppetserver package installs, it creates a certificate expecting its name to be 'puppet'. I think that makes sense, and I understand why it makes that assumption, but sometimes you can't have a host named puppet -- for example, there's a group at my organisation that has puppet.<organisation_domain>, even though it's not used to manage systems organisation-wide. I think it's important to know how to deal with that.

The rest of this post is just the puppet installation and making sure each host can chat to the puppet server.

Some Prep - Host Names and IPs


Remember, I said I was going to start with fresh Linux systems. I have two VMs running Ubuntu Server and two running CentOS. No additional software has been added yet.


Notice they're all named after the template I used to create them. My first step is to login on all of them, change their names in /etc/hostname and add an entry for all of them to each host's /etc/hosts file (that step is unnecessary when DNS is configured as they could look each other up via DNS). There is one small caveat -- the Puppet server always expects its name to be puppet so my _agents_ will be configured to use 'baratheon' but I'm still adding 'puppet' to baratheon's /etc/hosts file. It's weird, I know, but I'm still learning and I'm not sure how to deal with the server installation without doing that...and since it's local to the server itself, I'm not concerned with doing that. If I find out how to prevent that then I'll update this post.

With that done, after a reboot it looks a little more interesting:


The next step is to add the puppet repo and install the appropriate server or agent package.

The Puppet Server


My puppet server, baratheon, is running Ubuntu so I want to add the puppet apt repository for installation. Instead of trying to track down their GPG key, add it and then add their repo, I can do it all with one .deb file available from puppet. The instructions are here:

https://apt.puppetlabs.com/README.txt

but I'm going to outline them anyway.

First, download the .deb file from apt.puppetlabs.com:

wget https://apt.puppetlabs.com/puppetlabs-release-pc1-xenial.deb

Then install it with:

sudo dpkg -i puppetlabs-release-pc1-xenial.deb

Remember, this adds the puppet apt repository to the system - but it doesn't update the apt cache. Do that with:

sudo apt update

Then install the server with:

sudo apt install puppetserver

It will have quite a few dependencies. On my cable internet connection at home, this takes about five minutes to download and install.

The First Agent -- The Puppet Server


If you read that and you scratched your head, it's okay! Yes, I'm going to use Puppet *on the server* to manage some aspects of the puppet server itself. That means baratheon is both my server *and* my first agent - but not until I configure it that way.

The configuration file I care about is

/etc/puppetlabs/puppet/puppet.conf

The default file looks like this:


I want to add a few things. First, Puppet uses certificates for authentication and encryption of communication, and you can specify what you want the certificate name for a given host to be (don't worry, most of the certificate stuff is handled behind the scenes). In my case, I want the certificate for each host to have that host's name -- so baratheon's certificate will be named baratheon. Next, I want to make sure my clients know that the Puppet server lives at baratheon. Puppet has a notion of environments, so you can have one environment for 'test', one for 'quality_assurance', one for 'production', etc. The default environment is 'production' so I'm going to tell all of my systems to use that environment. Finally, I want all of my systems to check-in with the server every ten minutes.

To accomplish all of this, I'm going to add the following to puppet.conf on baratheon:


To ease copy/paste, I added these lines:

certname = baratheon
server = baratheon
environment = production
runinterval = 10m

I'm going to add that same block to all of my Puppet agents with one change -- "certname" will have a different value on each host. You can get more information on the configuration options at:

https://docs.puppet.com/puppet/4.10/config_file_main.html

Now I'll exit and do a little housekeeping to make sure Puppet is configured to start on bootup and that it's running now. To make sure it's enabled at boot, I'll use:

sudo systemctl enable puppetserver

And then I'll make sure it's running with:

sudo systemctl restart puppetserver

Be warned, it can take a few minutes for the puppetserver process to start/restart, especially if you are running it on a VM with only one core! If you don't see any output from the restart for a minute or two it's okay, just give it some more time.

Before I enrol my first agent, I want a way to test it. By default, Puppet looks in /etc/puppetlabs/code/environments/production/manifests to see if there are any files named <foo>.pp and then it applies whatever it finds in those files based on numeric/alphabetical order. In my scenario I want to have a separate <foo>.pp file for each node so I will have four of these - baratheon.pp, stark.pp, lannister.pp, bolton.pp. The general layout of those files is:

node <foo> {
  <stuff to do>
}

Again, <foo> is the name of the client. The most basic manifest for baratheon would look something like this:

node baratheon { }

And you can see that here:


It just says "I have a node named baratheon but I'm not going to tell it to do anything" - and that's okay! For this post we're just making sure everything is installed and can chat. This means I'm going to create the following files:

/etc/puppetlabs/code/environments/production/manifests/baratheon.pp
/etc/puppetlabs/code/environments/production/manifests/stark.pp
/etc/puppetlabs/code/environments/production/manifests/bolton.pp
/etc/puppetlabs/code/environments/production/manifests/lannister.pp

And all I'm going to put in them are empty node declarations like the one above (but make sure to change the name of each node inside the .pp files!!).

To make sure baratheon can get the manifest from itself, first I'm going to manually tell it to check in with the server and see if anything is waiting. To do that, I'll use:

sudo /opt/puppetlabs/bin/puppet agent --test

When I run it, I get the following:


Success! It successfully applied the catalogue. Now, if I want to make sure the agent is started and running at boot, I can either use systemctl or I can use puppet itself:

sudo /opt/puppetlabs/bin/puppet resource service puppet ensure=running enable=true

When it runs, Puppet will give output in the same format as a manifest:


This is taken from the Puppet documentation at:

https://docs.puppet.com/puppet/4.6/services_agent_unix.html

More Agents


Now that my server is configured, I can install the agent on my remaining Ubuntu and CentOS systems. On stark I'll use the same .deb file I downloaded on baratheon but instead of installing puppetserver I'm going to install puppet-agent. That means the instructions for all of my Ubuntu 16.04 agents will be:

wget https://apt.puppetlabs.com/puppetlabs-release-pc1-xenial.deb
sudo dpkg -i puppetlabs-release-pc1-xenial.deb
sudo apt update
sudo apt install puppet-agent

Then I'll edit the puppet.conf file to look like:

[agent]
certname = stark
server = baratheon
environment = production
runinterval = 10m

Notice the two changes: instead of [master] I used [agent] and for certname I used 'stark' instead of 'baratheon'. Now I need to make sure it can chat to baratheon. I'll use the same "puppet agent --test" command I used on baratheon:

sudo /opt/puppetlabs/bin/puppet agent --test

The output on an agent is a little different:


Since this is the first time this agent has checked in, Puppet will create an SSL certificate request on the server. On the server I can list any unsigned certificates with:

sudo /opt/puppetlabs/bin/puppet cert list

I'll have one waiting for stark so I'm going to go ahead and sign it with:

sudo /opt/puppetlabs/bin/puppet cert sign stark

If it succeeds then it will remove the signing request on the server and I get the following:


Now I'm going to go back to stark and try to check-in again using the same "puppet agent --test" command:


Excellent! I now have a Puppet server running on baratheon AND my first proper agent, stark, can poll for catalogues of activity to perform! Now I just need to make sure puppet starts on boot-up and that the puppet agent is running as a service:

sudo systemctl enable puppet
sudo systemctl restart puppet

With that done, I can move on to my CentOS agents.

Even More Clients: CentOS


The steps for CentOS are very similar to those for Ubuntu; the full instructions for both are available from Puppet at:

https://docs.puppet.com/puppet/4.10/install_linux.html

Still, I'm going to outline them. Basically, they are:

o install the pc1 package to setup the yum repo
o install the puppet-agent package
o edit puppet.conf
o run 'puppet agent test' to create the CSR
o sign it on the server
o run the test again to make sure it works
o make sure the agent is set to run at boot/is running with systemctl

Instead of signing each certificate, one for bolton and one for lannister, individually, I'm going to do everything to both of those VMs up until the CSR is generated, then I'm going to hop over to baratheon and sign both CSRs with one command (this is what you would do if, for example, you had just spun up a cluster of servers and wanted to sign their CSRs at one time). Then I'll go back to working on each VM. Since they're identical, I'm just going to write the commands once.

First, to install the pc1 package, you can either download it and then install it (what I would do in production, so I had a known-good installation source) or you can tell yum to install it directly from Puppet. I did the latter:

sudo rpm -ivh https://yum.puppet.com/puppetlabs-release-pc1-el-7.noarch.rpm

This yielded:


Then I installed puppet-agent with yum:

sudo yum install puppet-agent

Yum prompted to accept/install the Puppet GPG keys. Since I didn't want to cut my post short here, I pressed 'y'!

When that completed, I edited puppet.conf with the proper agent section:

[agent]
certname = bolton
server = baratheon
environment = production
runinterval = 10m

Then do the initial check-in/poll manually with 'puppet agent test':

sudo /opt/puppetlabs/bin/puppet agent --test

When I'd done that for bolton and lannister, I listed the certificates on baratheon and saw both of them. To sign them both, I used:

sudo /opt/puppetlabs/bin/puppet cert sign --all

When I listed and signed both certs, it looked like this:


Then I went back to each VM and make sure 'puppet agent test' pulled the catalogue for that system:


It worked! Then to make sure puppet is enabled at boot and that it was running:

sudo systemctl enable puppet
sudo systemctl restart puppet

Fantastic, four VMs all ready to be managed by Puppet!

Wrapping Up Part One


Okay, between you and I, I know, I didn't do anything groundbreaking. I have a handful of VMs that are all checking in with a single Puppet server and not doing anything...but at this point that's okay. The goal was to step through the installation and make sure that initial communication works and THAT goal has been accomplished.

So where to go from here?

Well, if you're Linux/Unix savvy, you may have noticed my Ubuntu VMs have a user named 'test' and my CentOS VMs have a user named 'demo'. That's a problem and in part two I want to look at how I can use each system's manifest file (the <name>.pp file) to make sure I have the same user on all four systems (and remove the existing 'test'/'demo' users). In part three I'll take a look at classes and in part four I'll use classes to install the ELK stack and setup a RabbitMQ node.

09 July 2017

The Three-Eyed Raven: Threat Intelligence With CIF


One of the big buzzwords in InfoSec right now (and it has been for a few years) is "threat intelligence" (TI). It goes right along with "indicators of compromise", or IOC, and many use the terms interchangeably. I admit, I'm guilty of it from time to time. Ultimately, though, they have very different meanings -  so for the context of this post, I want to go ahead and clarify *my interpretation* of what those things mean.

An indicator of compromise/IOC is a discrete, observable unit. It could be an IP address, an ASN, a file hash, a registry key, a file name or any of several other types that are observed as part of monitoring or performing forensics on a compromised (or suspected compromised) system.

Threat intelligence/TI should be comprised of an IOC *and additional contextual information*, such as when it was observed, under what conditions, etc. If someone tries to sell you threat intelligence that is just a feed of IPs and domain names, they aren't selling you threat intelligence - they're selling you indicators.

With that said, let's consider a scenario. You work for a company with small sites all over the country. Each site has their own SecOps person who also happens to be THE do-it-all IT person - they run the handful of servers, networking equipment and desktops/tablets/other endpoints at that site. There is no centralised logging infrastructure or SIEM yet. You work at site alpha and see a port scan against your external IP addresses. Then you see SSH brute-forcing attempts against your servers. Do you share this information with your colleagues at the other sites? If so, how? Do you send an email or drop it into a channel on your private IRC server?

Enter the Collective Intelligence Framework, or CIF.

A Quick Overview -- And the Installers!


First, you need to know that there are two popular versions of CIF, version 2 and version 3.

CIFv2 is *the* way to get started. It has moderate hardware requirements for a business application:

8+ cores
16GB+ RAM
250GB+ of disk, depending on how long you want to keep data - I've installed on systems with just 50GB

When you install it, you have a CIF instance backed by ElasticSearch and a command-line query tool. It will update nightly with Open Source Intelligence (OSINT) from multiple sources. The installer can be found here:

https://github.com/csirtgadgets/massive-octo-spice/wiki/PlatformUbuntu

CIFv3 is "in development" and seeing updates regularly. Like I said, CIFv2 is the way to get started - it's more mature, it has a larger user base, it's easier to get going and it has more forgiving requirements for those looking to get started:

2+ cores
4GB+ RAM
10GB+ disk - against, depending on how long you want to store data

If you choose to go the CIFv3 route, you should have a CIF instance backed by sqlite3 and a command-line query tool. It will also update regularly with OSINT from multiple sources. Its installer can be found here:


So, why am I even writing this post? Well...I don't really like sqlite3 for how I want to use CIF and you aren't forced to use sqlite3, but getting it backed by ElasticSearch isn't really documented - now that I have it working, why not share that information with the world?

First, ElasticSearch


As with everything I do that's Linux-related, I'm going to start with a "plain" Ubuntu Server 16.04 LTS install. As of the time of writing, that's 16.04.2 LTS.

I'm going to give it four cores, eight gigabytes of RAM, fifty gigabytes of disk and I'm not adding any additional packages or tools during installation. Please note that for this purpose, fifty gigs of disk is WAY more than I'll use. Twenty would be way more than I'll use. I'm only giving it fifty because that's how I'm setting up my new templates.

Because I want to back this with ElasticSearch, I'll need to install it plus its dependency: Java. You can follow the same steps I used in my previous posts on installing ElasticSearch, https://opensecgeek.blogspot.com/2017/02/farming-elk-part-one-single-vm.html, or you can follow the steps below. Below has one huge difference - I use the OpenJDK headless JRE that is included with apt instead of using the Java 8 installer from the webupd8team PPA.

First, some prep steps so apt knows about, and trusts, the Elastic repository:

wget -qO - https://artifacts.elastic.co/GPG-KEY-elasticsearch | sudo apt-key add -
echo "deb https://artifacts.elastic.co/packages/5.x/apt stable main" | sudo tee -a /etc/apt/sources.list.d/elastic-5.x.list

Now update the apt application list and install ElasticSearch:

sudo apt update
sudo apt install elasticsearch

Now tell systemd to start ElasticSearch at boot and start ElasticSearch:

systemctl enable elasticsearch
systemctl restart elasticsearch

At this point you should be able to run curl against ElasticSearch and ask for an index list (there should be none):

curl http://127.0.0.1:9200/_cat/indices?pretty

If ElasticSearch is running, you should immediately get another command prompt with no output from the above command.

ElasticSearch Defaults


By default, ElasticSearch will create all indices with five shards and one replica. This works great if you have multiple ElasticSearch nodes but I only have one node. To do a little ElasticSearch housekeeping, I'm going to apply a basic template that changes the number of replicas for my indices to 0.

This will apply to both the "tokens" index used for authorisation in CIF and the "indicators-<month>" index used for actual threat data. I am ONLY setting the new default to zero replicas because I have no intention of using any other nodes with ElasticSearch. If I were going to possibly add more nodes I would skip straight to "Now, CIF".

To make this change, I'll create a file that has the settings I want for all of my indices; in this case, I'm going to name it "basic-template" and I want every index to have 0 replicas.

{
  "template" : "*",
  "settings" : {
    "index" : {
      "number_of_replicas" : "0"
    }
  }
}

Then I'll use curl to save that template in ElasticSearch. Because I've used "template" : "*", this template will get applied to every index that's created. For a single-node setup this is fine; if I had a multi-node cluster backing my CIF instance, I might change the number of replicas so that I could speed up searching or to help with fault-tolerance. The curl command to import this template as "zero_replicas" would be:

curl -XPUT http://127.0.0.1:9200/_template/zero_replicas?pretty -d "$(cat basic-template)"

Now, CIF


First, grab the latest release of the deployment kit. As of writing, that is 3.0.0a5. The releases are listed here:

https://github.com/csirtgadgets/bearded-avenger-deploymentkit/releases

You can download 3.0.0a5 directly via wget:

wget https://github.com/csirtgadgets/bearded-avenger-deploymentkit/archive/3.0.0a5.tar.gz

Unzip the tarball with tar:

tar zxf 3.0.0a5.tar.gz

That should give you a directory called bearded-avenger-deploymentkit-3.0.0a4.  If you do a directory listing with ls, you'll see several subdirectories and configuration files. If you wanted to do a "generic" install of CIFv3, you could run "sudo bash easybutton.sh" and it would do its thing, leaving you with an sqlite3-backed CIF. That's not what we want, so let's make some changes!

The important file to edit is global_vars.yml. I've tried several combinations of the options to add and, while it doesn't matter what order the following are added, they do all need to be there to use ElasticSearch with CIFv3:


For copy and paste, the added lines are:

CIF_ES: 1
CIF_ANSIBLE_ES: 1
cif_store_store: elasticsearch
ANSIBLE_CIF_ES_NODES: 'localhost:9200'
CIF_ANSIBLE_ES_NODES: 'localhost:9200'

Now I can use the installer to get things rolling (note: on my Internet connection at home this took almost thirty minutes due to installing dependencies):

sudo bash easybutton.sh

Remember, this is CIFv3 and it's *in development*. The install may break but it's unlikely. With the tiniest bit of luck, you should end up with a command prompt and zero failures. You'll know if it failed, all of the text will be red and the last line will tell you how many tests it failed!

On Tokens and Hunters


The very last thing that the installer currently does is add "tokens" for specific accounts. "Tokens" are a hash used for authentication. By default, CIF will create a new user, "cif", with a home directory of "/home/cif", and in that directory is a token for the cif user, stored in "/home/cif/.cif.yml". Be careful with that token, it allows for *full administrative access* to your CIF installation. If it's just you and you are going to do everything with that account, great, but if you think you're going to have other users, feed in a lot of data, share data with other entities, etc., please take some time to read up on token creation:

cif-tokens --help

If you just run "cif-tokens" without any options, it will print out all of the tokens it knows about:


"hunters" are the real workhorses that get data into CIF and they are disabled by default because they can bring a system to a crawl if there are too many of them. With no value set, I have four on a fresh boot. To add more (and you want to), edit /etc/cif.env or /etc/default/cif and set CIF_HUNTER_THREADS = <x>. I set it to two and I have six cif-router threads running.


If I had a server with eight cores, and a separate ElasticSearch cluster, I may set that to four or higher. Just know the more you have, the more resources they're going to use!!

At this point I like to do a restart, just to make sure ElasticSearch and all of my cif processes will start up with a reboot.

A Simple Query


When the CIF server processes kick off, they set a pseudo-random timer for up to five minutes. At the end of that timer everything will start to work together to get data into your indicators-<month> index. I say this because if you query cif in the first few minutes after installing it, you're not going to get anything. At all. Zilch. I don't want you to think you have a broken install just because the hunters haven't had a chance to populate your back-end!!

Give it a few minutes. I'd give it fifteen or twenty. Seriously, just reboot the box and step away for a while. Go fix a cup of tea, have a glass of water, play with the dog, just make sure you let it do its thing for a bit. Sometimes I'll use curl to check on the elasticsearch index just to see how quickly it's growing:


When you come back to it you can start trying things out. Remember that by default the only user who can query CIF is your cif user - I usually just change user to cif with:

sudo su - cif

Then you can try a simple query with:

cif -q example.com

Notice you don't get anything back - just an empty table. That's because example.com doesn't show up in CIF by default. However, if you run the command again, you'll get something very different! For example, if I search now (I've done it a few times), I get:


Why is that? Well, by querying CIF, you have told it that you have something interesting. Notice how when I use "cif -q", it adds an entry -- that's because it's now a potential indicator. It also sets the tag to "search", meaning it was something I searched for manually, not that I received as part of a feed.

Notice all of the fields in my result for a simple query for "example.com":

"tlp": Traffic Light Protocol. This is the sharing restriction - just by querying, it gets set to "amber", typically meaning "share only if there's a need to know".
"lasttime": the last time, *in UTC*, that this indicator was seen
"reporttime": the time, *in UTC*, when this indicator was introduced to CIF
"count": the number of times CIF has seen this indicator
"itype": the indicator type; notice it is "fqdn", or "fully qualified domain name"
"indicator": the thing that was seen; in this scenario, "example.com"
"cc": the country code for the indicator; you'll see this a lot with IP addresses
"asn": the autonomous system number, again common with IPs
"asn_desc": usually the company responsible for that ASN
"confidence": your confidence level that this is something bad (or good, depending on how you use CIF)
"description": this is a great field for putting web links that have additional information
"tags": any additional "one word" tags you want to apply to the indicator
"rdata": this is "related" data; for a domain it may be an IP address - you can specify this value
"provider": the entity who provided this indicator; in this scenario it's the cif user using the "admin" token

See what I mean by the difference between having just an indicator (just an IP or domain) and turning it into intelligence by adding context and additional information? You may have "mybaddomain.co.uk" as an indicator but the description may have a link to an internal portal page that details everything you know about that domain. If "lasttime" is three months ago, and count is "2", why is this thing showing up again after three months of nothing?

Wrapping It All Up


Companies pay tens of thousands, or hundreds of thousands, of pounds (or dollars, or whichever currency you prefer) for "threat intel" but what does that mean? What are they getting - are they getting indicators or are they getting intelligence? How do they get it - is it via a STIX/TAXII download, a custom client?

More importantly, _can they use it effectively_? It does me no good to pay £10,000 per year for a "threat intelligence" feed if I don't have processes and procedures in place to do large imports of denied IPs/domains/etc, or to remove them if something gets in that I don't actually want to block. Moreover, I can't show that the intel I'm receiving has value if I don't have metrics around how useful the intel is - for example, how many incoming connection attempts were blocked by known port-scanners or brute-force endpoints?

Yes, "threat intelligence" can be useful, but make sure your program is of sufficient maturity to benefit from it and that you're actually getting your money's worth.

A New Year, A New Lab -- libvirt and kvm

For years I have done the bulk of my personal projects with either virtualbox or VMWare Professional (all of the SANS courses use VMWare). R...