With some recent changes to the way ELSA systems communicate, my original post on deploying ELSA has become somewhat antiquated and needed an update. The general process is still the same - Martin's excellent install script still handles all of the intricacies - but there have been a couple of changes.
The first deals with terminology. The word "peer" is replacing "node". You still do a "node" install or update but in the configuration file, elsa_web.conf, these are referred to as "peers".
The second deals with how the front-end (the web component) communicates with what are now called peers. In the past, the web front-end made direct connections to the databases on the respective nodes. Now, each installation has both the "node" and "web" types installed and all communication happens over HTTP or HTTPS!
Since this is an update to my previous post, I want to cover a fresh installation on Ubuntu Server 12.04 LTS - what appears to be a fairly common deployment platform and one that I actually have ELSA deployed on in production environments.
Step One: The Virtual Machines
Since I already had an Ubuntu 12.04 LTS virtual machine to use as a template (see my initial post on setting up a test lab for details of how I setup the original virtual machine), I just cloned out two copies - one to act as an ELSA "peer"/"node", the other to host the web front-end.
On the first I left the MAC address of the network card the same, on the second I chose to reinitialise the MAC address. For both virtual machines I chose the network to my internal psql_test network so they could communicate with each other. Note later that this meant eth0 became eth2 on that virtual machine. Below are the VirtualBox overviews for those two virtual machines.


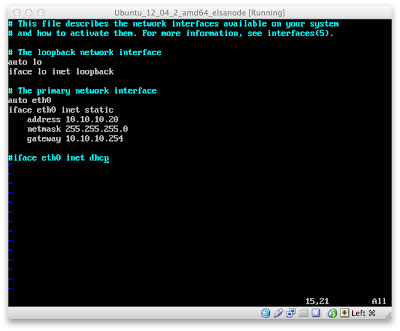
Since I had changed the network from "NAT" to "Internal", and because I don't run a DHCP server on the internal virtual network, I need to set static IPs for each VM. The "peer" VM is assigned 10.10.10.20 in /etc/network/interfaces:
The "web" VM is assigned 10.10.10.30 in the same file:

Remember that I noted one VM had the network adapter change from eth0 to eth2:

With no DHCP I had to assign a DNS server in /etc/resolv.conf. I set each VM to use Google's DNS service:

Karolis, one of the very helpful users from the ELSA users mailing list, has pointed out that this isn't a persistent DNS setting and that it needs to be set in the interfaces file. The second line of that file, at least on some distributions, contains the comment "DO NOT EDIT THIS FILE BY HAND -- YOUR CHANGES WILL BE OVERWRITTEN".
I am *only* setting the nameserver value here because I typically operate in an environment that requires the use of DHCP-provided DNS servers. To have that value persist through reboots (and through interface restarts), you need to edit /etc/network/interfaces (the same file used to set the IP address). To set the VM to use Google's DNS the line looks like:
dns-nameservers 8.8.8.8
If you wanted to use Google as primary and OpenDNS as secondary, you could use:
dns-nameservers 8.8.8.8 208.67.222.222
On the VM, this looks like:

Thanks again to Karolis for pointing that out!
Step Two: Update The OS
I hadn't updated the virtual machine template since not long after it was created. For a demo that's probably okay but what kind of Security Geek would I be if I didn't advocate updating the operating system before deploying it in production?!
With Ubuntu (and most any other Debian-based distribution), that's as simple as updating the "apt" database and then updating any packages installed via apt with:
sudo apt-get update
sudo apt-get upgrade


Step Three: Install ELSA
As with previous versions, Martin has kept the installation process extremely simple. First, download the installer script with:
wget http://enterprise-log-search-and-archive.googlecode.com/svn/trunk/elsa/contrib/install.sh
Note that I did this on both virtual machines.

Here is where the architectural change comes in. Instead of doing *only* a "node" or "web" install, each virtual machine gets both. You can combine the installation of both into one command. On both virtual machines, I ran the command:
sudo sh -c "sh ./install.sh node && sh ./install.sh web"

While the installation process was wrapping up I booted my KUbuntu virtual machine that has an interface in the virtual network "psql_test". After the installation process had finished on each virtual machine I tested the ELSA web front-ends on both by just browsing to their IPs in a web browser:


Success!
Step Four: One Front-End to Rule Them All
If you are only deploying one system then you are pretty close to done. All you need to do is setup your server to use https instead of http, add a couple of users to the ELSA database (or configure the LDAP plugin) so you can require authentication to query your logs and start pointing your syslog logs to the ELSA box.
That works great in a small environment, but larger environments may have two, three, ten or a hundred servers collecting syslog logs. There is absolutely no need to have to remember where each of your servers, firewalls and IDS log their events - it's much simpler to configure a bunch of log servers (ELSA "peers") and then query them all with a single (or multiple for failover) ELSA web front-ends. With the new architecture, this is easier than ever before.
First, I want to make sure the virtual machine I want to use for the front-end can ping the virtual machine I want to use as a peer, so on 10.10.10.30 I pinged 10.10.10.20 with:
ping 10.10.10.20

Then I opened /etc/elsa_web.conf on each virtual machine. The important sections are the "apikeys" hash and the "peers" block. This is what each looks like on my front-end virtual machine (actually this is what any new installation will look like if you used the default values):


In order for the front-end to query a "peer", in my case for 10.10.10.30 to be able to query 10.10.10.20, a section for that peer has to be added to /etc/elsa_web.conf on the front-end. Here is where it gets interesting.
All authentication between peers is handled via the value in the "apikey" hash at the top of the elsa_web.conf file. For new installs the "user" defaults to "elsa" and the key value defaults to "1". This makes it incredibly easy to test multiple peers. For my demo I added the following to the "peers" section on 10.10.10.30:
"10.10.10.20" : {
"apikey" : "1",
"url" : "http://10.10.10.20/",
"username" : "elsa"
}
And then restarted Apache with:
sudo /etc/init.d/apache2 restart
Below is he peers section of elsa_web.conf on 10.10.10.30 and the Apache restart command I used:


This indicates a peer listening for connections at http://10.10.10.20/. That machine should have an "apikeys" section in its elsa_web.conf file that has an user of "elsa" with a key value of "1".
With the restart, my front-end at 10.10.10.30 should have access to the logs on 10.10.10.20. I can test that in my KUbuntu VM by going to http://10.10.10.30 and making sure it indicates it can query two nodes:

When you deploy this it's usually a good idea to change the default key value for your ELSA user. You can also set custom usernames and keys for each peer you want to query. I wanted to show this in a demo so I decided to have my peer use a different username/key value pair. For this to take effect I first add the new user ("aCustomUserFor10101020") and key value ("aCustomKeyFor10101020") to the "apikeys" hash section of "elsa_web.conf" on the peer (10.10.10.20). The new "apikeys" section looks like:

Now, I need to edit the "peers" section of "elsa_web.conf" on the front-end (10.10.10.30). Note that all I changed in this file is the "username" and "apikey" value in the "peers" section:

With a change to both files, I needed to restart Apache again with
sudo /etc/init.d/apache2 restart
Then I tested my front-end again by pointing my KUbuntu browser to http://10.10.10.30 (you can just reload the page). All that I'm looking for is that the front-end still knows it will query two nodes:

Then, the moment of truth: an actual search! Since Martin includes a set of test logs as part of the install process, you can query for the word "seq". If you get results, and no warnings about peers, you know your installation was completely successful:

If you get results similar to the above then congratulations! As I noted at the start of Step Four, you probably want to configure your server to use https instead of http and you REALLY want to add users to the ELSA database so you can require username/password authentication for your users. Martin's project documentation at the official ELSA project page has some great instructions for adding users and permissions. Some six months later this is still my favourite piece of open source software.
If you don't want to go through manual configuration you can install SecurityOnion, a bootable image (with an install option) that includes some really great open source software like
However, if you want to JUST run ELSA on a server, or you just want to try out ELSA in a development location before installing it somewhere permanent, this page should provide more than enough to get started on that development environment.


