29 January 2017

Headless VirtualBox Part One: Creating a VM With SSH and RDP

For the duration of this blog I've used VirtualBox running locally. In 2012 and 2013 I ran it on a MacBook Pro. Now I run it on a combination of Windows 10 and that same MacBook Pro. That's well and good but having a lot of virtual machines can really fill a hard drive.

The organisation for which I work, and specifically the department in which I work, has some pretty serious funding problems. So problematic that in 2015 I bought two 27" monitors out of my own pocket to replace the two 19" monitors I had in the office. Later that year my monitor for my desktop at home died so I brought them home for a while. A few weeks ago I got tired of using the 19" again so I took the 27s back to work. That's left me with a desktop system at home that doesn't have any monitors and me wondering how best to use it.

Enter my comments about filling the hard drives in my laptops with virtual machine images! Since I have a machine with no monitors, I'm kind of curious about running VirtualBox "headless". It's certainly not as convenient as running the VMs locally but the hardware is available. I also have an entire shrimp, andouille and bleu cheese pizza, a few cans of Diet Coke and an otherwise free Saturday night so why not give it a shot?

Installing on Ubuntu 16.04.1 LTS


Since I use macOS at work and macOS and Windows 10 at home, I haven't installed VirtualBox on Linux in a while - in a very long while, as a matter of fact, since I've primarily used OS X (and now macOS Sierra) as my desktop OS since right after Snow Leopard came out.

VirtualBox has full download/installation instructions for Linux available at:

https://www.virtualbox.org/wiki/Linux_Downloads

Since he box I have available is already running Ubuntu 16.04 LTS, I followed the instructions for Debian-based distributions.

Note: because the system doesn't have monitors, I'm going to do everything over either SSH or VRDE, the VirtualBox Remote Desktop Extension, which is basically RDP.

First, add the VirtualBox repository to apt:

echo 'deb http://download.virtualbox.org/virtualbox/debian xenial contrib' | sudo tee -a /etc/apt/sources.list.d/virtualbox.list

Download and add the Oracle public key for apt:

wget https://www.virtualbox.org/download/oracle_vbox_2016.asc
sudo apt-key add oracle_vbox_2016.asc

Then synch the package index files from the apt sources and install the latest version of VirtualBox:

sudo apt-get update
sudo apt-get install dkms virtualbox-5.1

NOTE!! You can't interact with VirtualBox over VRDE until after you've installed the extension pack *as root*. You can download it with (one line):

wget http://download.virtualbox.org/virtualbox/5.1.14/Oracle_VM_VirtualBox_Extension_Pack-5.1.14-112924.vbox-extpack

And then install it with (one line):

sudo VBoxManage extpack install Oracle_VM_VirtualBox_Extension_Pack-5.1.14-112924.vbox-extpack

Unless something has gone terribly wrong, it should be a fairly quick and painless process!

Creating My First VM

The first VM I want to add is FreeBSD - it's a light install and the only install I've done so far that's quicker is OpenBSD. First, download the ISO (one line):

wget ftp://ftp.freebsd.org/pub/FreeBSD/releases/amd64/amd64/ISO-IMAGES/11.0/FreeBSD-11.0-RELEASE-amd64-disc1.iso

Then create a new VM configuration with VBoxManage:

VBoxManage createvm --name "FBSD Test" --ostype FreeBSD_64 --register

I think a 5GB hard drive is much more than enough for a simple install but I'm going to add a 5GB disk, just in case:

VBoxManage createhd --filename "FBSD_Test.vdi" --size 5000

Live CDs and DVDs are usually treated as IDE devices so I'm going to add an IDE controller (one line):

VBoxManage storagectl "FBSD Test" --name "IDE Controller" --add ide --controller PIIX4

Attach the 5GB hard drive from above to the VM (one line):

VBoxManage storageattach "FBSD Test" --storagectl "IDE Controller" --port 0 --device 0 --type hdd --medium FBSD_Test.vdi

Attach the FreeBSD CD to the VM (one line):

VBoxManage storageattach "FBSD Test" --storagectl "IDE Controller" --port 0  --device 1 --type dvddrive --medium FreeBSD-11.0-RELEASE-amd64-disc1.iso

Make sure VRDE is enabled in the configuration:

VBoxManage modifyvm "FBSD Test" --vrde on

Then start the VM:

VBoxManage startvm "FBSD Test" --type headless

If everything has gone correctly, you should see a message similar to:

VM "FBSD Test" has been successfully started.

The entire process should look something like this. Notice I've split the long lines with " \ ", an operator in Unix and Linux that lets you split long commands across multiple lines - in this case, I've done it for visibility purposes so that each section is easier to read.


But do I have a proper running VM that's waiting to have FreeBSD installed from the ISO to a 5GB disk?

Remote Desktop


When I had a Linux (or FreeBSD) desktop, I used rdesktop to RDP to Windows hosts:

http://www.rdesktop.org/

On OS X (and now macOS), I prefer the actual Microsoft Remote Desktop client available from iTunes:

https://itunes.apple.com/us/app/microsoft-remote-desktop/id715768417?mt=12

The configuration for a new connection is fairly straight-forward, all you really need to provide are a connection name and PC name (this can be a FQDN, an IP address or an AD name). Note that VRDE uses the local PAM authentication on Linux so the username and password should be that of the user running VirtualBox:


Once I started the session I saw the FreeBSD install menu - at least a partial success!


I enabled scaling and then repositioned the window a little to get a better view:


To save you having to deal with screenshots up through the installation, I'll give a quick spoiler: it works!

NOTE: After the install completes, you may have to perform the equivalent of manually ejecting and removing a CD/DVD image. Despite rational convention, there is a storageattach function but no storagedetach - instead, you have to attach an empty drive. In this scenario I used "IDE Controller port 0 device 1" as my CD/DVD drive where I attached the FreeBSD ISO so now I need to detach it by attaching an "emptydrive":

VBoxManage storageattach "FBSD Test" --storagectl "IDE Controller" --port 0 --device 1 --type dvddrive --medium emptydrive

Summary


VirtualBox is really intended for personal use on the desktop and competes most closely with VMWare's Workstation/Fusion, Parallels and Microsoft's Hyper-V (don't be misled by that statement, Hyper-V certainly has a place in production virtualisation environments). If you need to run production virtual machines on a dedicated VM server there are multiple solutions available.

VMWare makes ESXi available for free:

http://www.vmware.com/products/vsphere-hypervisor.html

If you're in a Linux environment you can base your VMs on KVM or Virtuozzo with OpenVZ:

http://www.linux-kvm.org/page/Main_Pagehttps://openvz.org/Main_Page

Or, if you like Amazon's AWS, you can use Xen:

https://www.xenproject.org/users/getting-started.html

As mentioned, there's also Hyper-V:

https://www.microsoft.com/en-us/cloud-platform/server-virtualizationhttps://docs.microsoft.com/en-us/virtualization/hyper-v-on-windows/quick-start/enable-hyper-v

That doesn't mean you HAVE to run VirtualBox locally, though - they have a complete command set available to do interesting things with virtual machine using VBoxManage that gives you a lot of power when coupled with access tools like SSH.

In truth I may never use it again - this is the first time in many years of using VirtualBox that I've done anything with a headless setup - but if nothing else it was an interesting way to spend a Saturday night!

26 January 2017

BIND and ELK: Or, How I Learnt to Stop Worrying and Trust in Grok


As I'm pretty sure I've said every time I discuss DNS, I like BIND. What I don't like, though, is BIND logging, and that caused a problem for me at work today when I wanted to import BIND query logs into ELK. Let's take a look at why...and then how to solve it!

Don't worry, I'm going to come back to doing basic BIND and ELK installs in other posts but right now I have an itch that needs to get scratched.

Example BIND Logs


First, let's take a look at what BIND's query log looks like. To do that, I've installed Ubuntu 16.04 Server in a VM and then installed BIND via apt. I made sure to enable query logging and did a few lookups with 'dig' and 'host', just to get a few different types of queries. Be warned that there are some gotchas around logging if you're going to try this at home - I'll address these when I do an actual post about BIND on Ubuntu later.

So what do they look like?


If you're familiar with syslog, that is definitely NOT a syslog message! They list no facility nor program name. Even if you decide to send the messages to syslog, you're left with mingling them with other messages (not that there is anything wrong with that, I just don't think it's very clean - I like have a single file that is JUST query logs). That's okay, though, right? After all, you can have syslog-ng or rsyslog pick the contents of the file up and ship it over to an actual syslog server and it's perfectly searchable with grep, perl, python, whatever. But if you want to ingest it in ELK, and be able to do interesting things with it, it's not that simple...

What Logstash Sees


To give you an idea of how logstash sees things, I've setup a VERY SIMPLE ELK installation. By "very simple", I mean I've installed everything on one VM running Ubuntu 16.04 Desktop and copied the query log to that system so I can feed it directly into logstash and have it display how it parses each line to standard out (to screen). Right now it's not trying to store anything in elasticsearch and I'm not trying to search for anything in Kibana, I just want to see how each line is parsed:


Notice how everything meaningful from our log entry is encapsulated in the "message" field - and that's not very useful if you want to do something interesting like determine how many unique IPs on your network have searched for a specific domain or which domains <this IP> looked up over <this time period>. To do that, we have to have the logs in a format elasticsearch can understand - and for that, I'm going to use grok.

Constructing a Grok Expression


Grok expressions can be daunting, especially in the beginning (I am very intimidated by them). While searching for something else I came across a great tool for building grok expressions:


I decided to use it to try to match a few lines from my query log:


If you want to try it yourself, here is what I pasted in:

25-Jan-2017 21:45:35.932 client 127.0.0.1#58483 (bbc.co.uk): query: bbc.co.uk IN A +E (127.0.0.1)
25-Jan-2017 21:46:05.665 client 127.0.0.1#51602 (amazon.co.uk): query: amazon.co.uk IN A +E (127.0.0.1)
25-Jan-2017 21:46:11.422 client 127.0.0.1#56018 (google.co.uk): query: google.co.uk IN A +E (127.0.0.1)
25-Jan-2017 21:46:35.125 client 127.0.0.1#52503 (youtube.co.uk): query: youtube.co.uk IN A +E (127.0.0.1)
25-Jan-2017 22:43:05.510 client 127.0.0.1#56259 (www.parliament.uk): query: www.parliament.uk IN A +E (127.0.0.1)

After a few iterations of choosing MONTHDAY, MONTH and YEAR, and then manually adding my on dashes in between, I had the timestamp for each line matched with the following expression:

%{MONTHDAY}-%{MONTH}-%{YEAR}

And in the tool, it looked like this:


With a bit more work, I was able to work out an expression that matched all of the lookups I'd performed:

%{MONTHDAY}-%{MONTH}-%{YEAR} %{TIME} client %{IP}#%{NUMBER} \(%{HOSTNAME}\): query: %{HOSTNAME} IN %{WORD} \+%{WORD} \(%{IP}\)

That's a great first step! However, if I just use that in my logstash configuration, I still can't search by query or client IP because elasticsearch wont know about those. For that to work, I need to assign some names to the elements in my log entries (notice: this is done inside the grok filter):

%{MONTHDAY}-%{MONTH}-%{YEAR} %{TIME} client %{IP:clientIP}#%{NUMBER:port} \(%{HOSTNAME}\): query: %{HOSTNAME:query} IN %{WORD:query_type} \+%{WORD} \(%{IP}\)

Test Again


First I updated my very basic logstash configuration to have a "filter" section with a grok expression to match my DNS log examples:


And then restart logstash (note I'm calling the logstash binary directly so I can use stdin/stdout rather than having it read a file or write to elasticsearch):


Now logstash knows about things like "clientIP", "port" and "query"!

Summary


Okay, I know, it needs a little more work. For example, I need to work on a mutate filter that replaces the @timestamp field (notice that's the time the log entry was received by logstash, not when it was created in query.log) with an ISO8601 version of the time the log entry was created. I also need to add a custom field, something like "received_at", to make sure I capture the time the item was received by logstash. Both of those are exercises for another time and for anyone who may be following at home.

I also know the current filter is incomplete because I only tested it with A record lookups. Would the same filter work for PTR lookups? DNSSEC validation? All of my tested queries were recursive where EDNS was in use (the +E flag), will it fail on recursive queries with no flags? (Spoiler: yes, it will, that should be an optional flag field). Please do not copy/paste the above filters and expect them to be "production-ready"!!

I am certain there are other ways to solve this problem and there are almost certainly cleaner filters out there. I'm just starting to scratch the surface of what can be done with filters and with ELK in general, but knowing there are tools and methods available to ingest custom log formats (and normalise those formats into something elasticsearch knows how to index and search!) goes a long way towards having the confidence to build out an ELK deployment that your organisation can use.

21 January 2017

OSG 2.0 Setup: A Simple OpenBSD Router


The first VM for my lab is the OpenBSD router. OpenBSD has a phenomenal security track record, no additional software needs to be installed and you're guaranteed the latest and greatest pf. That last point is *especially* important to me because, IN MY PERSONAL OPINION, pf in FreeBSD sort of stagnated. That's not to say it's bad, it's just based on a fairly old version of OpenBSD's pf and doesn't support some of the things I really like (like the ability to dump the pfsync interface).

I'm going to skim over some very important things in this post. For example, this is not an introduction to learning the 'vi' editor, the basics of the Unix command line or an overview of using VirtualBox. There are tutorials and intros out there that are far better than I could cover the topics. My assumption is that you either know some Unix (or Linux) and networking basics or are interested enough to use your favourite search engine to figure out how to edit files, what certain commands do, etc.

With that, let's get started!

Getting OpenBSD


OpenBSD is available for download "for free". If you like OpenBSD, please consider either buying it or making a donation to the OpenBSD Project:

https://www.openbsd.org/orders.html
https://www.openbsd.org/donations.html

Disclaimer: I am not affiliated with the OpenBSD Project in any way other than as a happy user of their software.

If you choose to download OpenBSD, you can select your download location from their list of mirrors:

https://www.openbsd.org/ftp.html

I grabbed my ISO from the MIT mirror. VirtualBox is 64-bit OS friendly so I always use the amd64 port (quick link to the latest as of writing: http://mirrors.mit.edu/pub/OpenBSD/6.0/amd64/install60.iso).

For production use, I would absolutely recommend verifying the SHA hash for your download!

A New VirtualBox VM


The first step is to create a VM for the router. This is pretty straight-forward. VirtualBox is not just 64-bit friendly, if you choose BSD as your virtual machine type you can choose "OpenBSD (64-bit)" as your version!


For this scenario I'm going to accept all of the defaults. This means very meager resource allocations - but that's okay, it's enough for this purpose. This means a virtual machine with 64MB of RAM and 2GB of disk. Very meager indeed!

Installation

For almost any VM installation, you'll use the ISO file as a CD/DVD. This is done through the "Storage" section of the VM settings -- just choose the installation ISO as the optical drive and start the VM:


As soon as the VM boots you'll have the option to begin the installation:


The installation process is very quick and very straight-forward, especially if you are doing a "vanilla" installation. Advanced users will want to do interesting things like changing partition sizes but I will, once again, accept all of the defaults.

The one exception is that during the install process you may receive a message similar to, "Directory does not contain SHA256.sig. Continue without verification?". It is safe, in testing, to say "Yes".

When the installation completes you can send the VM the power off signal.

Making a Clone

I am a stickler for having a "reference" installation that I can keep updated, basically a template version of each operating system that I can use to make copies so I don't have to do a new install each time I want to try something out. Since I need to make some quick changes to this VM before booting and configuring the router anyway, this is a good time to make a full clone.

First, make sure to remove the OpenBSD install ISO as a storage device (Storage under the VM properties)!

To make the clone, just right-click the VM and choose "Clone", then select "Full Clone". You may not even see the progress meter since the VM is so small. I named mine "OpenBSD Router".

Two Networks

Since the clone VM is going to be a router, now is the time to add the second network interface. This is done through the Networking section of "Settings":


NB: by default, the "Name" field may say "intnet" - I clicked the box and named it "LabServerNet" since the first network I want to add is for my server VMs!

Make it a Router


The OpenBSD project has some fantastic documentation regarding configuring OpenBSD to be a router. That documentation can be found at:

https://www.openbsd.org/faq/pf/example1.html

It is not my goal to duplicate that. Instead, I'm going to do the bare minimum to have a basic router that meets my needs. To that end, everything I do below is stolen from that page so please please PLEASE read their documentation -- aside from fantastic software, the OpenBSD project has some of the best, if not THE best, documentation available. Use it!

First, you should have an em0 interface that has an IP address:


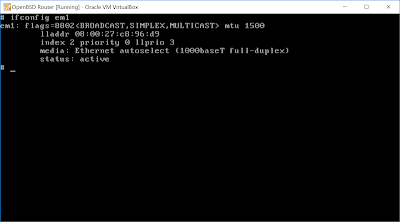
You should also have an em1 interface that does NOT have an IP address:


This naming scheme is perfect, in my opinion. It is easy for me to remember that em0 is the outside interface and em1 is the inside interface (0 == outside, 1 == inside).

Next I want to make sure the internal interface has an address. For some reason I'm partial to 10.10.10.0/24 as my internal network so that's what I'll assign to that interface:

ifconfig em1 10.10.10.1 netmask 255.255.255.0 up

Checking ifconfig for em1 should now be more interesting:


To make this persist through a reboot, you need to make sure there is a file in /etc that corresponds to the interface. This is specific to OpenBSD and makes configuring an interface very straightforward (certainly more maintainable, in my opinion, than something like /etc/networks/interfaces!). For em1, that means creating /etc/hostname.em1 and making sure the configuration for em1 is added. You can do this with a one-line command!

echo 'inet 10.10.10.1 255.255.255.0 10.10.10.255' > /etc/hostname.em1

This means, "assign the IPv4 address 10.10.10.1, with a netmask of 255.255.255.0 and broadcast of 10.10.10.255, to the network interface labelled em1".


To make sure OpenBSD knows to forward IPv4 traffic between interfaces, enable IP forwarding in /etc/sysctl.conf. Again, this is a one-liner!

echo 'net.inet.ip.forwarding=1' >> /etc/sysctl.conf


This setting will take effect after you reboot the VM (but you don't need to do that yet!).

Note also that this time I used '>>' instead of '>'. If you're new to Unix, '>' will overwrite whatever is in the file (which is fine if you're creating a file) and '>>' will append if the file already exists (which is really what I find myself doing most of the time and is safer than using '>' if there is ANY question as to whether you need to keep what's already there).

pf

By default, pf is enabled and running. You can verify this with

pfctl -s s

On a fresh installation, don't be surprised if you see connections to port 123 on a remote system. NTP, the Network Time Protocol, is active by default to make sure your VM keeps its clock up-to-date. Don't worry, this doesn't mean someone hacked your VM!

Configuring pf to NAT is a simple one-liner added to the end of /etc/pf.conf (note: I am assuming you know how to use vi to edit a file; if you don't, you want to learn the vi basics since it's found on almost all Unix installations and many Linux installations by default):

pass out on em0 inet from em1:network to any nat-to em0


What does that say?

Basically, that says, "let IPv4 traffic from any IP address in the same network as em1 go to anywhere and make it have a source address of em0". Again, please read the OpenBSD documentation for PF and NAT. The actual NAT FAQ for pf can be found here:

https://www.openbsd.org/faq/pf/nat.html

Reboot

At this point you should be able to reboot and test the router. This means you'll need another VM on the LabServerNet network and configured to use 10.10.10.1 as its gateway. A quick and easy way to do that is to clone the original OpenBSD VM to another clone just to use as a test VM. I cloned the VM to "OpenBSD Test", set the first interface to use LabServerNet and boot it up, then configured em0 to use the new router with:

ifconfig em0 10.10.10.10 netmask 255.255.255.0 up
route add default 10.10.10.1

Then I tested everything by doing a DNS lookup for google.com against Google's DNS servers:

dig google.com @8.8.8.8

The whole thing looked like this:


On the router itself, I logged in and checked the pf state table with "pfctl -s s". This returned:


Success!

Summary


There is a LOT of really good documentation from the OpenBSD project, please read it. They cover configuring pf and routers much, much better than I can. I just wanted to hit the highlights for a very, very basic router (the "quick and dirty" setup). As a Linux sys-admin I was very fond of ipchains, then of iptables/netfilter, but I have always been partial to pf on OpenBSD and FreeBSD.

With the router ready, I can start building out the rest of the lab!

13 January 2017

OSG 2.0 Setup: What Does it Look Like?


I know that I want to look at several things in my test lab - FreeBSD servers, Ubuntu servers, Grouper, OpenLDAP, ELK + Kafka, SecurityOnion, CIF and others. To do this, each server needs to be able to communicate with the others. It also means each server may need Internet access to get the specific pieces of software I want to try.

Options...


There are a couple of options to accomplish this. I can have multiple network interfaces for each system, so that each server is multi-homed, but that makes it more difficult to look at things like SecurityOnion. The better way is to have each server connected to the same internal network and then let them connect to the Internet through a router. An even better way is to have segmented networks with desktops in one network, internal services in another and external services in another. The best way is to have multiple internal VLANs, similar to a properly segmented network, but I'm not going to go THAT far with VirtualBox...at least, I don't plan on it!

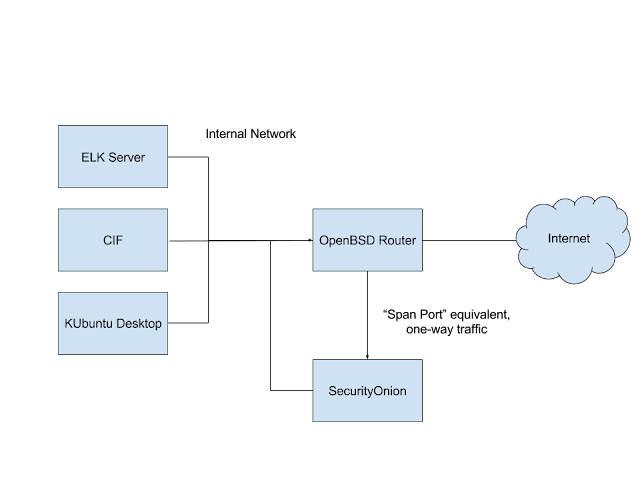
Instead, I'm going to start with a flat network - the type many small businesses will have. Servers and workstations will be in the same IP space, everything will go through an OpenBSD router and the router will send a copy of all Internet traffic to SecurityOnion. It will look like this...


*AHEM* A Small Clarification


One quick note on the router and SecurityOnion systems. The OpenBSD router would have three interfaces - one "internal", one "external" (to the Internet) and one that acts as a "span". The SecurityOnion system would have two interfaces - one for Internet access that sits on the "internal" network and a second to receive "span" traffic from the router. The "span" interface will NOT have an IP address and traffic will NOT be forwarded from one interface to the other.

But Is It Realistic?


This basic setup can scale for most small and medium-sized environments. You may have high availability routers, multiple Internet connections, Bro or Snort clusters and multiple VLANs behind the routers but conceptually the model is the same. Linux and BSD routers perform very well at multi-gig speeds and can perform NAT functions at hundreds of thousands of sessions per second for tens of thousands of devices. OpenBSD with pf and CARP is networking poetry in motion (and something I want to write about this time!). Do not be afraid to experiment!!

05 January 2017

Starting Over

When I left off a couple of years ago, I had a lot of stuff left unwritten. I had ideas about follow-ups to my DFIR post, I had ideas about follow-ups to my OSSEC post and I had ideas about a series on SecurityOnion.

Really, it was the DFIR follow-ups that put a halt on my writing. I have drafts that are three years old; I don't like their tone, I don't like their message and I don't like their content. Sometimes you have to know when to throw something away

So I've decided to scrap my drafts and, yes, start over with a clean lab.

The Environment 2.0


Over the last few years I have followed the trend that so many of my favourite projects have followed -- almost everything I have now (as far as security tools and servers) is running on Ubuntu Server LTS. It's a great place to start, I like it...but I really miss the BSDs. So, for OSG 2.0, I want to use OpenBSD and FreeBSD as often as possible. A lot has changed since I stopped using FreeBSD 8.3 (including a major overhaul to the package manager!) so this should be a good excuse to jump back in.

The other big change to the environment is that I've switched laptops! I loved my MacBook Pro and I still think they are brilliant machines -- I still opt to use one at work. Recently, though, I've converted to a Dell running Windows 10 Pro and I have to say I like it. That it comes with spill protection is a huge benefit - my MacBook Pro was dealt a mortal blow by a cup of diet grape juice one night and Apple does NOT offer spill protection.

Windows 10, VirtualBox and some BSDs...what could go wrong?

A New Year, A New Lab -- libvirt and kvm

For years I have done the bulk of my personal projects with either virtualbox or VMWare Professional (all of the SANS courses use VMWare). R...