A Quick Note
A lot of folks like to write about things they know very well and about which they can answer questions. Generally speaking I prefer to write about things that I can at least troubleshoot to *some degree*. The next few posts will not be any of those because I have no idea what I'm doing with puppet. I'm pretty excited!
The Test Environment
My environments are primarily Ubuntu Linux with a smattering of Windows Server 2012R2, Windows Server 2016 and CentOS. To keep things simple I'm going to stick with Ubuntu Server 16.04 and CentOS 7.
In the last year I have jumped really, really deep into the Elastic stack. I've seen demos for things that ultimately border on useless because they either a) assume your environment is very small or b) show you how to add '2 + 2' and then expect you to make the leap from that to differential equations. I'm not going to do that.
Instead, I want to go step by step (more or less) from four fresh Linux systems to a fully configured ELK + RabbitMQ stack, managed almost entirely via puppet. This entire ecosystem will look like this:
o Ubuntu Server 16.04.2 LTS for puppet named baratheon
o Ubuntu Server 16.04.2 LTS for ELK named stark
o CentOS 7 for ElasticSearch named greyjoy (this will cluster with ES on stark)
o CentOS 7 for RabbitMQ named bolton
Each server will have one core, four gigabytes of RAM, twenty gigabytes of disk and four gigabytes of swap.
Note: All of the documentation I've read expects your puppet server to be named 'puppet'. When the puppetserver package installs, it creates a certificate expecting its name to be 'puppet'. I think that makes sense, and I understand why it makes that assumption, but sometimes you can't have a host named puppet -- for example, there's a group at my organisation that has puppet.<organisation_domain>, even though it's not used to manage systems organisation-wide. I think it's important to know how to deal with that.
The rest of this post is just the puppet installation and making sure each host can chat to the puppet server.
Some Prep - Host Names and IPs
Remember, I said I was going to start with fresh Linux systems. I have two VMs running Ubuntu Server and two running CentOS. No additional software has been added yet.

Notice they're all named after the template I used to create them. My first step is to login on all of them, change their names in /etc/hostname and add an entry for all of them to each host's /etc/hosts file (that step is unnecessary when DNS is configured as they could look each other up via DNS). There is one small caveat -- the Puppet server always expects its name to be puppet so my _agents_ will be configured to use 'baratheon' but I'm still adding 'puppet' to baratheon's /etc/hosts file. It's weird, I know, but I'm still learning and I'm not sure how to deal with the server installation without doing that...and since it's local to the server itself, I'm not concerned with doing that. If I find out how to prevent that then I'll update this post.
With that done, after a reboot it looks a little more interesting:

The next step is to add the puppet repo and install the appropriate server or agent package.
The Puppet Server
My puppet server, baratheon, is running Ubuntu so I want to add the puppet apt repository for installation. Instead of trying to track down their GPG key, add it and then add their repo, I can do it all with one .deb file available from puppet. The instructions are here:
https://apt.puppetlabs.com/README.txt
but I'm going to outline them anyway.
First, download the .deb file from apt.puppetlabs.com:
wget https://apt.puppetlabs.com/puppetlabs-release-pc1-xenial.deb
Then install it with:
sudo dpkg -i puppetlabs-release-pc1-xenial.deb
Remember, this adds the puppet apt repository to the system - but it doesn't update the apt cache. Do that with:
sudo apt update
Then install the server with:
sudo apt install puppetserver
It will have quite a few dependencies. On my cable internet connection at home, this takes about five minutes to download and install.
The First Agent -- The Puppet Server
If you read that and you scratched your head, it's okay! Yes, I'm going to use Puppet *on the server* to manage some aspects of the puppet server itself. That means baratheon is both my server *and* my first agent - but not until I configure it that way.
The configuration file I care about is
/etc/puppetlabs/puppet/puppet.conf
The default file looks like this:

I want to add a few things. First, Puppet uses certificates for authentication and encryption of communication, and you can specify what you want the certificate name for a given host to be (don't worry, most of the certificate stuff is handled behind the scenes). In my case, I want the certificate for each host to have that host's name -- so baratheon's certificate will be named baratheon. Next, I want to make sure my clients know that the Puppet server lives at baratheon. Puppet has a notion of environments, so you can have one environment for 'test', one for 'quality_assurance', one for 'production', etc. The default environment is 'production' so I'm going to tell all of my systems to use that environment. Finally, I want all of my systems to check-in with the server every ten minutes.
To accomplish all of this, I'm going to add the following to puppet.conf on baratheon:

To ease copy/paste, I added these lines:
certname = baratheon
server = baratheon
environment = production
runinterval = 10m
I'm going to add that same block to all of my Puppet agents with one change -- "certname" will have a different value on each host. You can get more information on the configuration options at:
https://docs.puppet.com/puppet/4.10/config_file_main.html
Now I'll exit and do a little housekeeping to make sure Puppet is configured to start on bootup and that it's running now. To make sure it's enabled at boot, I'll use:
sudo systemctl enable puppetserver
And then I'll make sure it's running with:
sudo systemctl restart puppetserver
Be warned, it can take a few minutes for the puppetserver process to start/restart, especially if you are running it on a VM with only one core! If you don't see any output from the restart for a minute or two it's okay, just give it some more time.
Before I enrol my first agent, I want a way to test it. By default, Puppet looks in /etc/puppetlabs/code/environments/production/manifests to see if there are any files named <foo>.pp and then it applies whatever it finds in those files based on numeric/alphabetical order. In my scenario I want to have a separate <foo>.pp file for each node so I will have four of these - baratheon.pp, stark.pp, lannister.pp, bolton.pp. The general layout of those files is:
node <foo> {
<stuff to do>
}
Again, <foo> is the name of the client. The most basic manifest for baratheon would look something like this:
node baratheon { }
And you can see that here:
It just says "I have a node named baratheon but I'm not going to tell it to do anything" - and that's okay! For this post we're just making sure everything is installed and can chat. This means I'm going to create the following files:
/etc/puppetlabs/code/environments/production/manifests/baratheon.pp
/etc/puppetlabs/code/environments/production/manifests/stark.pp
/etc/puppetlabs/code/environments/production/manifests/bolton.pp
/etc/puppetlabs/code/environments/production/manifests/lannister.pp
To make sure baratheon can get the manifest from itself, first I'm going to manually tell it to check in with the server and see if anything is waiting. To do that, I'll use:
sudo /opt/puppetlabs/bin/puppet agent --test
When I run it, I get the following:

Success! It successfully applied the catalogue. Now, if I want to make sure the agent is started and running at boot, I can either use systemctl or I can use puppet itself:
sudo /opt/puppetlabs/bin/puppet resource service puppet ensure=running enable=true
When it runs, Puppet will give output in the same format as a manifest:

This is taken from the Puppet documentation at:
https://docs.puppet.com/puppet/4.6/services_agent_unix.html
More Agents
Now that my server is configured, I can install the agent on my remaining Ubuntu and CentOS systems. On stark I'll use the same .deb file I downloaded on baratheon but instead of installing puppetserver I'm going to install puppet-agent. That means the instructions for all of my Ubuntu 16.04 agents will be:
wget https://apt.puppetlabs.com/puppetlabs-release-pc1-xenial.deb
sudo dpkg -i puppetlabs-release-pc1-xenial.deb
sudo apt update
sudo apt install puppet-agent
Then I'll edit the puppet.conf file to look like:
[agent]
certname = stark
server = baratheon
environment = production
runinterval = 10m
Notice the two changes: instead of [master] I used [agent] and for certname I used 'stark' instead of 'baratheon'. Now I need to make sure it can chat to baratheon. I'll use the same "puppet agent --test" command I used on baratheon:
sudo /opt/puppetlabs/bin/puppet agent --test
The output on an agent is a little different:

Since this is the first time this agent has checked in, Puppet will create an SSL certificate request on the server. On the server I can list any unsigned certificates with:
sudo /opt/puppetlabs/bin/puppet cert list
I'll have one waiting for stark so I'm going to go ahead and sign it with:
sudo /opt/puppetlabs/bin/puppet cert sign stark
If it succeeds then it will remove the signing request on the server and I get the following:

Now I'm going to go back to stark and try to check-in again using the same "puppet agent --test" command:

Excellent! I now have a Puppet server running on baratheon AND my first proper agent, stark, can poll for catalogues of activity to perform! Now I just need to make sure puppet starts on boot-up and that the puppet agent is running as a service:
sudo systemctl enable puppet
sudo systemctl restart puppet
With that done, I can move on to my CentOS agents.
Even More Clients: CentOS
The steps for CentOS are very similar to those for Ubuntu; the full instructions for both are available from Puppet at:
https://docs.puppet.com/puppet/4.10/install_linux.html
Still, I'm going to outline them. Basically, they are:
o install the pc1 package to setup the yum repo
o install the puppet-agent package
o edit puppet.conf
o run 'puppet agent test' to create the CSR
o sign it on the server
o run the test again to make sure it works
o make sure the agent is set to run at boot/is running with systemctl
Instead of signing each certificate, one for bolton and one for lannister, individually, I'm going to do everything to both of those VMs up until the CSR is generated, then I'm going to hop over to baratheon and sign both CSRs with one command (this is what you would do if, for example, you had just spun up a cluster of servers and wanted to sign their CSRs at one time). Then I'll go back to working on each VM. Since they're identical, I'm just going to write the commands once.
First, to install the pc1 package, you can either download it and then install it (what I would do in production, so I had a known-good installation source) or you can tell yum to install it directly from Puppet. I did the latter:
sudo rpm -ivh https://yum.puppet.com/puppetlabs-release-pc1-el-7.noarch.rpm
This yielded:

Then I installed puppet-agent with yum:
sudo yum install puppet-agent
Yum prompted to accept/install the Puppet GPG keys. Since I didn't want to cut my post short here, I pressed 'y'!
When that completed, I edited puppet.conf with the proper agent section:
[agent]
certname = bolton
server = baratheon
environment = production
runinterval = 10m
Then do the initial check-in/poll manually with 'puppet agent test':
sudo /opt/puppetlabs/bin/puppet agent --test
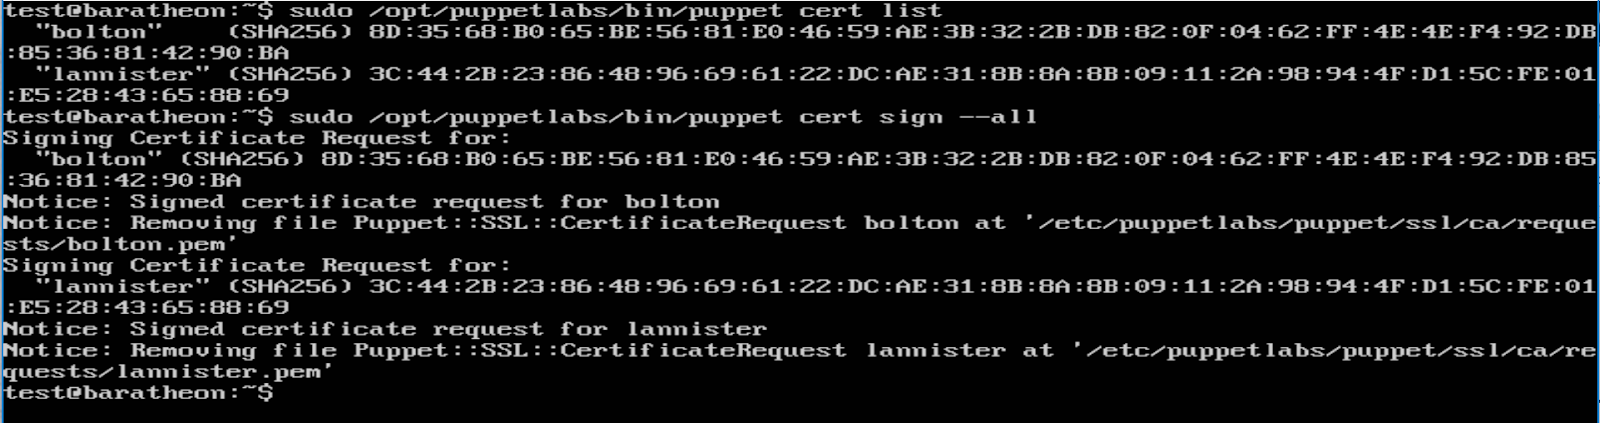
When I'd done that for bolton and lannister, I listed the certificates on baratheon and saw both of them. To sign them both, I used:
sudo /opt/puppetlabs/bin/puppet cert sign --all
When I listed and signed both certs, it looked like this:
Then I went back to each VM and make sure 'puppet agent test' pulled the catalogue for that system:


It worked! Then to make sure puppet is enabled at boot and that it was running:
sudo systemctl enable puppet
sudo systemctl restart puppet
Fantastic, four VMs all ready to be managed by Puppet!
Wrapping Up Part One
Okay, between you and I, I know, I didn't do anything groundbreaking. I have a handful of VMs that are all checking in with a single Puppet server and not doing anything...but at this point that's okay. The goal was to step through the installation and make sure that initial communication works and THAT goal has been accomplished.
So where to go from here?
Well, if you're Linux/Unix savvy, you may have noticed my Ubuntu VMs have a user named 'test' and my CentOS VMs have a user named 'demo'. That's a problem and in part two I want to look at how I can use each system's manifest file (the <name>.pp file) to make sure I have the same user on all four systems (and remove the existing 'test'/'demo' users). In part three I'll take a look at classes and in part four I'll use classes to install the ELK stack and setup a RabbitMQ node.


No comments:
Post a Comment
Note: only a member of this blog may post a comment.