29 July 2013

Enterprise Logging With ELSA: An Architecture Change, HTTP/S Only!


With some recent changes to the way ELSA systems communicate, my original post on deploying ELSA has become somewhat antiquated and needed an update. The general process is still the same - Martin's excellent install script still handles all of the intricacies - but there have been a couple of changes.

The first deals with terminology. The word "peer" is replacing "node". You still do a "node" install or update but in the configuration file, elsa_web.conf, these are referred to as "peers".

The second deals with how the front-end (the web component) communicates with what are now called peers. In the past, the web front-end made direct connections to the databases on the respective nodes. Now, each installation has both the "node" and "web" types installed and all communication happens over HTTP or HTTPS!

Since this is an update to my previous post, I want to cover a fresh installation on Ubuntu Server 12.04 LTS - what appears to be a fairly common deployment platform and one that I actually have ELSA deployed on in production environments.

Step One: The Virtual Machines


Since I already had an Ubuntu 12.04 LTS virtual machine to use as a template (see my initial post on setting up a test lab for details of how I setup the original virtual machine), I just cloned out two copies - one to act as an ELSA "peer"/"node", the other to host the web front-end.

On the first I left the MAC address of the network card the same, on the second I chose to reinitialise the MAC address. For both virtual machines I chose the network to my internal psql_test network so they could communicate with each other. Note later that this meant eth0 became eth2 on that virtual machine. Below are the VirtualBox overviews for those two virtual machines.


Since I had changed the network from "NAT" to "Internal", and because I don't run a DHCP server on the internal virtual network, I need to set static IPs for each VM. The "peer" VM is assigned 10.10.10.20 in /etc/network/interfaces:
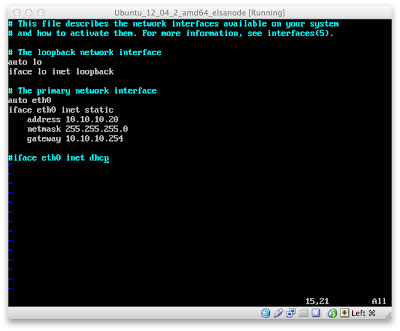

The "web" VM is assigned 10.10.10.30 in the same file:


Remember that I noted one VM had the network adapter change from eth0 to eth2:


With no DHCP I had to assign a DNS server in /etc/resolv.conf. I set each VM to use Google's DNS service:


Karolis, one of the very helpful users from the ELSA users mailing list, has pointed out that this isn't a persistent DNS setting and that it needs to be set in the interfaces file. The second line of that file, at least on some distributions, contains the comment "DO NOT EDIT THIS FILE BY HAND -- YOUR CHANGES WILL BE OVERWRITTEN".

I am *only* setting the nameserver value here because I typically operate in an environment that requires the use of DHCP-provided DNS servers. To have that value persist through reboots (and through interface restarts), you need to edit /etc/network/interfaces (the same file used to set the IP address). To set the VM to use Google's DNS the line looks like:

dns-nameservers 8.8.8.8

If you wanted to use Google as primary and OpenDNS as secondary, you could use:

dns-nameservers 8.8.8.8 208.67.222.222

On the VM, this looks like:


Thanks again to Karolis for pointing that out!

Step Two: Update The OS


I hadn't updated the virtual machine template since not long after it was created. For a demo that's probably okay but what kind of Security Geek would I be if I didn't advocate updating the operating system before deploying it in production?!

With Ubuntu (and most any other Debian-based distribution), that's as simple as updating the "apt" database and then updating any packages installed via apt with:

sudo apt-get update
sudo apt-get upgrade


Step Three: Install ELSA


As with previous versions, Martin has kept the installation process extremely simple. First, download the installer script with:

wget http://enterprise-log-search-and-archive.googlecode.com/svn/trunk/elsa/contrib/install.sh

Note that I did this on both virtual machines.


Here is where the architectural change comes in. Instead of doing *only* a "node" or "web" install, each virtual machine gets both. You can combine the installation of both into one command. On both virtual machines, I ran the command:

sudo sh -c "sh ./install.sh node && sh ./install.sh web"


While the installation process was wrapping up I booted my KUbuntu virtual machine that has an interface in the virtual network "psql_test". After the installation process had finished on each virtual machine I tested the ELSA web front-ends on both by just browsing to their IPs in a web browser:


Success!

Step Four: One Front-End to Rule Them All


If you are only deploying one system then you are pretty close to done. All you need to do is setup your server to use https instead of http, add a couple of users to the ELSA database (or configure the LDAP plugin) so you can require authentication to query your logs and start pointing your syslog logs to the ELSA box.

That works great in a small environment, but larger environments may have two, three, ten or a hundred servers collecting syslog logs. There is absolutely no need to have to remember where each of your servers, firewalls and IDS log their events - it's much simpler to configure a bunch of log servers (ELSA "peers") and then query them all with a single (or multiple for failover) ELSA web front-ends. With the new architecture, this is easier than ever before.

First, I want to make sure the virtual machine I want to use for the front-end can ping the virtual machine I want to use as a peer, so on 10.10.10.30 I pinged 10.10.10.20 with:

ping 10.10.10.20


Then I opened /etc/elsa_web.conf on each virtual machine. The important sections are the "apikeys" hash and the "peers" block. This is what each looks like on my front-end virtual machine (actually this is what any new installation will look like if you used the default values):
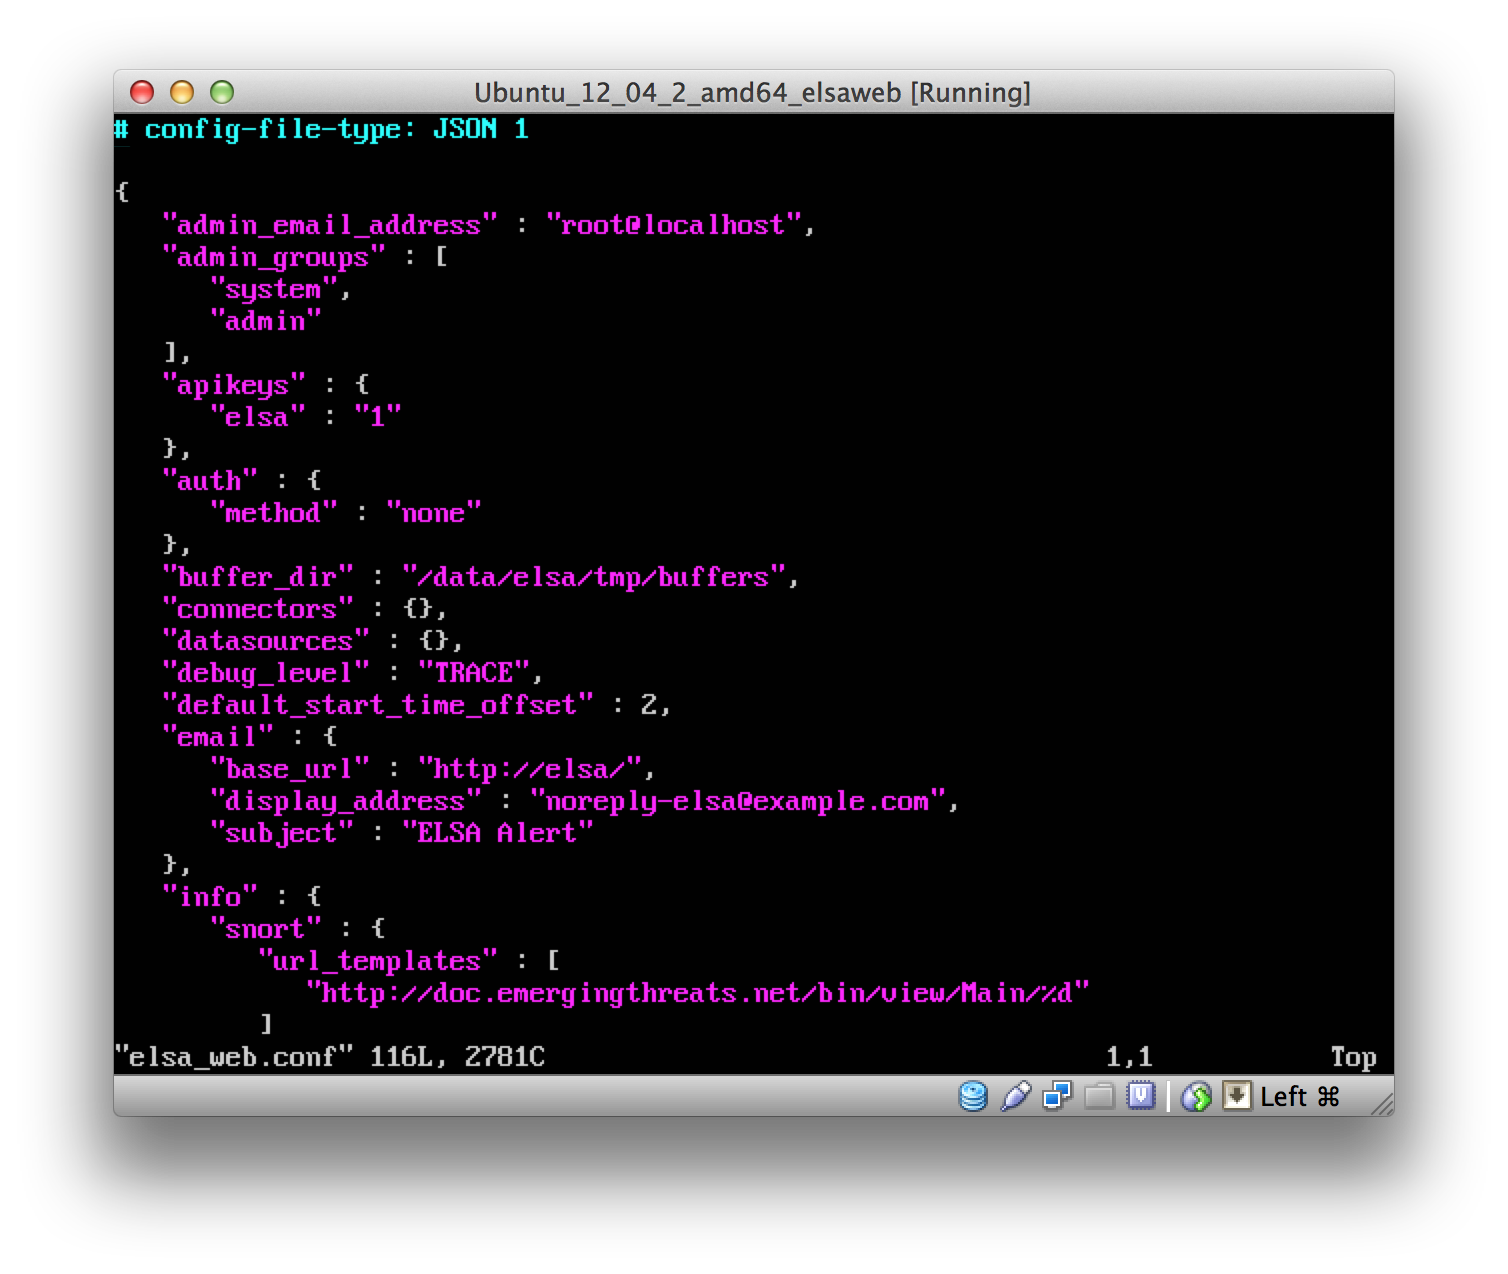


In order for the front-end to query a "peer", in my case for 10.10.10.30 to be able to query 10.10.10.20, a section for that peer has to be added to /etc/elsa_web.conf on the front-end. Here is where it gets interesting.

All authentication between peers is handled via the value in the "apikey" hash at the top of the elsa_web.conf file. For new installs the "user" defaults to "elsa" and the key value defaults to "1". This makes it incredibly easy to test multiple peers. For my demo I added the following to the "peers" section on 10.10.10.30:

"10.10.10.20" : {
   "apikey" : "1",
   "url" : "http://10.10.10.20/",
   "username" : "elsa"
}

And then restarted Apache with:

sudo /etc/init.d/apache2 restart

Below is he peers section of elsa_web.conf on 10.10.10.30 and the Apache restart command I used:


This indicates a peer listening for connections at http://10.10.10.20/. That machine should have an "apikeys" section in its elsa_web.conf file that has an user of "elsa" with a key value of "1".

With the restart, my front-end at 10.10.10.30 should have access to the logs on 10.10.10.20. I can test that in my KUbuntu VM by going to http://10.10.10.30 and making sure it indicates it can query two nodes:


When you deploy this it's usually a good idea to change the default key value for your ELSA user. You can also set custom usernames and keys for each peer you want to query. I wanted to show this in a demo so I decided to have my peer use a different username/key value pair. For this to take effect I first add the new user ("aCustomUserFor10101020") and key value ("aCustomKeyFor10101020") to the "apikeys" hash section of "elsa_web.conf" on the peer (10.10.10.20). The new "apikeys" section looks like:


Now, I need to edit the "peers" section of "elsa_web.conf" on the front-end (10.10.10.30). Note that all I changed in this file is the "username" and "apikey" value in the "peers" section:


With a change to both files, I needed to restart Apache again with

sudo /etc/init.d/apache2 restart

Then I tested my front-end again by pointing my KUbuntu browser to http://10.10.10.30 (you can just reload the page). All that I'm looking for is that the front-end still knows it will query two nodes:


Then, the moment of truth: an actual search! Since Martin includes a set of test logs as part of the install process, you can query for the word "seq". If you get results, and no warnings about peers, you know your installation was completely successful:


If you get results similar to the above then congratulations! As I noted at the start of Step Four, you probably want to configure your server to use https instead of http and you REALLY want to add users to the ELSA database so you can require username/password authentication for your users. Martin's project documentation at the official ELSA project page has some great instructions for adding users and permissions. Some six months later this is still my favourite piece of open source software.

If you don't want to go through manual configuration you can install SecurityOnion, a bootable image (with an install option) that includes some really great open source software like


However, if you want to JUST run ELSA on a server, or you just want to try out ELSA in a development location before installing it somewhere permanent, this page should provide more than enough to get started on that development environment.

10 March 2013

HIDS With OSSEC Part 1: A Basic Install

I really like Bro. I do. I can't pretend I don't. From a network monitoring perspective it *rocks*. If it's HTTP, FTP or SMTP, bro has you covered...but those are all network related and use clear-text protocols.

What about those times where someone plugs in a thumb drive and copies a malicious file to your client? What happens when a trusted partner is compromised and a piece of malicious code is uploaded to your web server from the compromised host at that trusted partner? Clearly we need some type of file integrity solution. My servers primarily run FreeBSD, RHEL and Ubuntu, but I use a Mac and run Windows 7 at home, so where is the sweet spot for cross-platform monitoring?

OSSEC to the rescue.

OSSEC, or Open Source SECurity, has been around for a while - I have been a happy user since about 2007. It provides File Integrity Monitoring (FIM), registry monitoring on Windows, rootkit detection, log anomaly detection and more, meaning you can use it to satisfy monitoring requirements for PCI and various other regulated environments.

The VM Prep - Clone and System Update


The bulk of my servers run FreeBSD. Since I already have a FreeBSD template available (FBSD_8_3_i386_101, if you're following from the beginning of my posts), I'll clone it out as FBSD_105_ossec_server. As with the others this is a Full clone, with interfaces in the "psql_test" and NAT networks


Because of how the interfaces are presented to FreeBSD, "Adapter 1" (the psql_test network) appears as em1 and "Adapter 2" (the NAT network) appears as em0. So networking works in my VM, I edited /etc/rc.conf to reflect the proper network setup and rebooted:


It has been several months since I created that FreeBSD template so the operating system, the ports tree and anything installed from the ports tree are probably out of date and I want to make sure my VM is up-to-date when I build and install OSSEC, so I've used the freebsd-update utility to update the operating system to the latest patch level and rebooted:
sudo freebsd-update fetch
sudo freebsd-update install
sudo shutdown -r now
To update the ports tree, and any installed ports, I've used portsnap and portmaster. The options I've passed to portmaster tell it to recurse dependencies, create a package for the newly updated port, remove the downloaded distfiles for each port and update all out-of-date ports. The FreeBSD project has incredible documentation, much better than I was used to in the Linux world, and the man page for portmaster is very informative:
sudo portsnap fetch update
sudo portmaster -t -g -d -a

OSSEC Server - The Installation


I know already that the port for the OSSEC server is security/ossec-hids-server, but if you want to find a particular port, you can change directory to /usr/ports and do a search by name. For example, to find any port with "ossec" in the name, you could do:
cd /usr/ports
make search name=ossec
Since I know the name is ossec-hids-server, this makes a very clean example. Doing a search for that yields:


To install the OSSEC server, I'll use portmaster:
sudo portmaster -g -d security/ossec-hids-server
The default options for the port are fine for my example but if you want to push your OSSEC output to a database, be sure to add support for the one you want to use.

OSSEC Server - Minimal Tweaks for New Installation


There are some nice things enabled by OSSEC "out-of-the-box", and the generic configuration is a pretty good place to start getting your feet wet. That said, there are a few necessary edits to start getting data from OSSEC.

OSSEC has its configuration at /usr/local/ossec-hids/etc/ossec.conf. I'm a vi/vim person so I edited it with:
sudo vi /usr/local/ossec-hids/etc/ossec.conf
If you're really a glutton for punishment, and want to see how it alerts "out-of-the-box", you only need to make one change under the "global" section, where email gets handled. I'll leave email notification on but I'll have it sent to localhost. In a production environment I'd use my organisation email address and SMTP servers but in this case I'll keep it local and use the following:
<global>
  <email_notification>yes</email_notification>
  <email_to>demo@localhost</email_to>
  <email_from>ossecm@localhost</email_from>
  <smtp_server>127.0.0.1</smtp_server>
</global>
To tell FreeBSD to start OSSEC on boot, add the following line to /etc/rc.conf:
ossechids_enable="YES"
Then you can start OSSEC with:
sudo /usr/local/etc/rc.d/ossec-hids start
To get a VERY quick sample of an alert, use sudo to edit something. To double-check something for this post, I edited the ossec.conf file after starting OSSEC - since it was the first time I had used sudo since OSSEC had started watching my logs, it should have alerted me. Most flavours of Unix and some Linux distributions include the "mail" utility by default so I'll use it to check email on the local VM.  I would highly recommend you read the mail man page ("man mail"), particularly the section on reading mail.


Keep in mind this is a VERY vanilla installation. There are a TON of rules that get loaded by default and a lot are going to be extraneous for simple environments, so it's important to go through and comment out or remove the items you don't want to load.

OSSEC Server - Some More Options


Even more important than removing what you do NOT want is adding what you DO want. For example, if you look in the ossec.conf file, under the section for "syscheck", you'll find that the default FreeBSD OSSEC installation monitors for changes in the following directories:
/etc
/bin
/sbin
/usr/bin
/usr/sbin
But I like to add the other common directories for configuration files and binaries on a FreeBSD system - /usr/local/etc, /usr/local/bin and /usr/local/sbin, so I add a line that looks like:
<directories check_all="yes">/usr/local/etc,/usr/local/bin,/usr/local/sbin</directories>
If you are hosting web content then you can use OSSEC to audit the stored files under, e.g., /usr/local/www, by adding that as a directory to watch. 

If you want to monitor a specific file for changes, you can use the <localfile> option. This is how I specify locations/log files on different systems. For example, a lot of Unix systems use /var/log/messages, because that is a common syslog log file for the system, but some Linux distributions use /var/log/syslog.

If there are files you know will change often, like an application log, you can ignore that file with <ignore>. There are several examples of monitoring directories and files, excluding files and OSSEC's "active response" in ossec.conf.

It's possible to run each system as a stand-alone entity but in a larger environment I much prefer the simplification of centralised management and a shared configuration file, so in part two I'll dive into adding agents and shared configurations.

24 February 2013

NSM With Bro-IDS Part 5: In-house Modules to Leverage Outside Threat Intelligence


Unless you just do not follow the InfoSec world or main-stream media, the odds are pretty high that you've heard about the Mandiant APT1 report available at

http://intelreport.mandiant.com

There is some awesome information in that report and they've provided a ton of data in the form of Indicators of Compromise, or IOCs. It wasn't too long afterwards that Seth Hall released a script module for Bro IDS that incorporated some of those indicators. That module is available here:

https://github.com/sethhall/bro-apt1

Within a couple of days, Symantec released their own "Comment Crew: Indicators of Compromise" report. That report can be found here:

http://www.symantec.com/content/en/us/enterprise/media/security_response/whitepapers/comment_crew_indicators_of_compromise.pdf

To my knowledge, nobody has released a Bro module that incorporates any of that data and I wanted to use it -- so guess what I did tonight?

Good Programmers Borrow, Great Programmers Steal


Since I've never written a custom module for Bro, and because I had already started using Seth's module, I decided that imitation was the greatest form of flattery and decided to use his module as a template for my own. After all, this guy eats, sleeps and lives Bro. If you're going to follow anyone's lead on writing a module for it, whose code would be better for re-use?


I used the default location for my bro install, /usr/local/bro, so Seth's module is installed in /usr/local/bro/share/bro/site/apt1. That means any custom modules will go in /usr/local/bro/share/bro/site, so I went ahead and changed to that directory and copied Seth's module to a new directory called "sccrew" (Symantec Comment Crew):
cd /usr/local/bro/share/bro/site
sudo cp -prv apt1 sccrew
cd sccrew

I saved all of the domains in the Symantec report to a plain text file - one domain per line, each domain in quotes and all but the last with a comma at the end of the line. That means the file looks something like this:
"domain_0.com",
"domain_1.com",
"domain_n.com"


Some stuff you can toss, some stuff you keep...


The README.rst file and .git directory are both going to be useless for this purpose so you can go ahead and remove them, leave them, it doesn't matter, but it's good practice to go ahead and remove them.

The other files are important. data.bro contains the actual indicators. If you view it in vi, you'll see Seth's comments, the module name, a list of hashes, a list of domains, etc. I removed everything in the file EXCEPT the domain block, then deleted the existing domains and replaced them with the domains I saved from the Symantec report. Then I changed the module name from APT1 to SCCREW and saved the file.

__load__.bro basically "includes" the data.bro and main.bro files. Leave it untouched.

main.bro controls the actions to take. I modified the APT1::Domain_Hit to be a SCCREW::Domain_Hit and removed the other notice types. I changed the module name to SCCREW, removed the x509_certificate and http_message components and changed anything in the dns_request section from APT1 to SCCREW. A little tweaking of the message that accompanies alarms to indicate it's from the Symantec report, not Mandiant's APT1, and the file was ready to be saved.

From there it was trivial to edit my /usr/local/bro/share/bro/site/local.bro and add the magic line that calls the sccrew module:
@load "sccrew"

Update the Running Instance!


Then I told bro to install the new configuration and update its running configuration:
sudo broctl check
sudo broctl install
sudo broctl update
And with that, boom, I had a module loaded that would alert based off of the Symantec indicators.

You can view the actual module here:

https://github.com/kevinwilcox/bro-sccrew

Many, many thanks to Seth for providing a great template to use for in-house modules and to Symantec for releasing a fairly small dataset that served as a great tool for looking at how to create a custom module for DNS alarms!

13 February 2013

MySQL and ELSA - When Your Storage Runs Out


There has been recent discussion on the ELSA users mailing list about variations on the following scenario:

o SysAdmin (SA) has a single large drive
o SA installs Linux or BSD, MySQL and ELSA
o Something consumes all free space
o SA realises they need to to move ELSA and MySQL to another drive

I didn't think a lot about it when it came up the first time. After it came up multiple times, though, I figured I would write up some instructions, starting with item three from above -- something fills up the hard disk.

The Environment


I already have a running ELSA installation on Ubuntu Server, and I configured it with a single drive, so all of the setup is already done. If you're following along with some of my earlier posts, the exact VM I'm going to work with is Debian_121_elsanode:


I know that I'm going to fill my drive, and I know I'm going to have to add a drive, so I'll go ahead and do that before I boot the VM. In this case I'll add an 8GB data drive called, "Debian_121_elsanode_mysql_data". The process is outlined in screenshots below.

In the VM settings, choose "storage" and then select the SATA controller. Click the icon for "Add Hard Disk":


I want to "Create new disk":


I like to use VMDK files if I think I might export the VM as an appliance:


I don't need to waste the time setting aside all of the space for the new drive, I won't have it long enough to use more than a couple of hundred MB -- and that's a stretch, odds are it's less than 100 MB:


Give the new drive an unique name inside of VirtualBox. "Create" will finally create the new drive:


When I booted the VM I verified Ubuntu picked up the two hard disks with:
dmesg | grep -e sda -e sdb
Note the drive sizes in the output - new drives are added in lexicographical order but it's always nice to verify you're working with the correct drive:


Prepping the New Drive


In reality, the new drive would get added *after* realising there is a storage issue. For the purposes of this demo, though, that's okay, it doesn't matter if the existing drive fills up and then I add the new one and move ELSA/MySQL or if I add the new drive, fill the old one and then move what I need.

So, let's go ahead and prep the new drive. I won't start moving data to it but I'll go ahead and partition and format it.

First, partition the drive with fdisk.
sudo /sbin/fdisk /dev/sdb


This starts fdisk. I can use 'p' inside of fdisk to show me the existing partitions for /dev/sdb:


To create a new partition that uses the entire drive, I'll hit 'n' for new, 'p' for primary, accept the default value of '1' for the partition number, accept the first and last cylinders, then use 'p' again to show the new partition:


Use 'w' to write the changes to the partition table and quit.

With the new partition ready, I need to format it before I can mount it. I prefer ext3, your mileage may vary. To format it in ext3, I'll use:
sudo /sbin/mkfs.ext3 /dev/sdb1
Note that when it runs, I get journal and superblock information. On physical drives, particularly large drives that aren't SSD, this can take a while to run.


One utility every Linux and Unix admin should use on a regular basis is 'df', for 'disk free'. I use the '-h' flag to get "human readable" output -- basically it just outputs all values in kilo-, mega- or gigabytes. It's  great for seeing, in short order, the amount of free space on a partition:


Fill The Old Drive


So I have about 16GB free on my root partition (where both ELSA and MySQL live). To quickly fill that up, I'm going to use a utility called 'dd'. My input will be /dev/zero (so I quickly get values - /dev/random and /dev/urandom can be considerably slower) and I'll output to a file called "consume_drive". Since I'm not giving 'dd' a count, it will run to completion - in this case, until the drive fills up.


Just to verify, I used the mysql command to connect to the locally running database instance, list the existing databases and try to create a new one (note it errors due to full disk):


Recovery Step One: Stop the Running Processes


At this point I would start receiving errors from Sphinx, MySQL and probably rsyslog saying I had disk issues. To kill all of them, I used killall with each process name and used the mysql init script to stop mysqld:
sudo killall -9 syslog-ng searchd perl
sudo /etc/init.d/mysql stop


Note that you DEFINITELY want to make sure searchd and elsa.pl aren't running, otherwise the system load can go through the roof when MySQL stops:


Recovery Step Two: Mount the New Drive, Move Data


With everything stopped, I mounted the new drive as /mnt using:
sudo mount /dev/sdb1 /mnt
I moved everything in /data to the new drive:
cd /data
sudo mv * /mnt/
Then I moved the MySQL database directory from /var/lib/mysql to the new drive:
sudo mv /var/lib/mysql /mnt/

Just for display purposes, the output of 'mount' and a directory listing of /mnt are included:


Recovery Step Three: Mount Point for the New Drive


Since I'm adding the new drive to house all of the MySQL and ELSA data, and I'd already decided to mount the drive as /data, I just need to add one line to /etc/fstab to reflect the new disk and mount point:


Recovery Step Four: MySQL Link


Since all of my MySQL data will live on /data, and I don't really want to fuss around with editing the MySQL configuration file to point to the new location, I'll create a symbolic link from /data/mysql to /var/lib/mysql (remember: hard links can't cross mountpoints, soft/symbolic links can) using:
sudo ln -sf /data/mysql /var/lib/mysql
Right now that location doesn't exist but it will on reboot, as long as the appropriate entry is in /etc/fstab and there are no filesystem issues.

EDIT -- 16 February 2013

I heard from Mike Miller at Miller Twin Racing that on machines with SELinux enabled, there are additional steps that must be taken. It turns out if you try to restart MySQL at this point then you get a failure, even though the symlink is in place:


If you look at the security contexts for /var/lib and /var/lib/mysql, you'll see that /var/lib has a context of var_lib_t and /var/lib/mysql has a context of mysqld_db_t:


There are multiple ways to solve this, the cleanest probably being to add a custom data_dir context that the mysql user can access/write. Since I am treating /data as an extension of /var/lib, a reasonable compromise for me was to give /data the same context as /var/lib and set the context for both /data/mysql* and the /var/lib/mysql symlink to that of the original /var/lib/mysql. This is accomplished with:
semanage fcontext -a -t var_lib_t /data
semanage fcontext -a -t mysqld_db_t "/data/mysql(/.?*)"
semanage fcontext -a -f -l -t mysqld_db_t /var/lib/mysql
restorecon -Rv /


Again, thanks to Mike Miller at Miller Twin Racing for that heads up and the correction!

Recovery Step Five: Reboot


Yes, really, reboot. You can remount /dev/sdb1 as /data to test but this is a virtual, non-production environment and I've followed the steps in this blog post a half-dozen times before actually writing it so I'm pretty confident of the outcome. On reboot /data gets mounted, the symlink for /var/lib/mysql is live and MySQL should be able to restart. You can verify all of this after reboot with a simple 'ps' and 'grep':
ps aux | grep -e perl -e syslog-ng -e sphinx -e mysql
If everything works, you should see output similar to:


Recovery Step Six: ... Profit


Okay, so maybe no profit, but you can rest comfortably knowing that you now have quite a bit of disk space available for your database and syslog needs, that you now can migrate services from a smaller disk to a larger disk with some basic Unix-fu and that you are almost certainly a better system administrator because of it!

A New Year, A New Lab -- libvirt and kvm

For years I have done the bulk of my personal projects with either virtualbox or VMWare Professional (all of the SANS courses use VMWare). R...